
PBS 187 of X: Back to Jekyll
After a hiatus for some related topics and some tidbits, we’re returning to our exploration of using the static site generator Jekyll to build websites on GitHub Pages. In the first part of this series, we focused our attention on the tools needed to control how your Jekyll site looks. We described Jekyll’s build process, then explored the suite of variables Jekyll makes available, and learned about the Liquid templating engine Jekyll uses to render sites.
Now, we’re shifting our focus from controlling a site’s visual appearance to organising its contents.
Matching Podcast Episode
You can also Download the MP3
Read an unedited, auto-generated transcript with chapter marks: PBS_2026_10_10
Demo Site Now Supports Docker
Since we last used our Jekyll demo site, Helma Van Der Linden was kind enough to contribute Tidbit 17, teaching us all how to use Docker to simplify our development environment.
Helma explains Docker in great detail, and the worked example she uses throughout is a custom Docker setup for running Jekyll. If you want to create your own Jekyll Docker image, or indeed any Docker image of your own, you’ll need to understand all three parts of that marathon TidBit, but if you simply want to use Docker to run Jekyll without needing to do battle with your OS’s native install of Ruby, you can copy Helma’s final example into your own Jekyll projects for a bells-and-whistles Docker image that just works!
Since learning this very useful skill from Helma, I’ve been doing all my Jekyll development work using Helma’s example Docker setup, and just like Helma promised, it really does make life a lot easier!
So, for those of you who find the Ruby part of Jekyll as tedious as I do, I’ve merged Helma’s example into the demo site we’ve been building throughout our Jekyll instalments.
To start using Docker to run the demo site, simply:
-
Install Docker Desktop from docker.com/…
- Download or clone any version of the
pbs-jekyll-demoSiterepo after the commit taggeddockerfrom GitHub - Open a terminal in the downloaded/cloned folder and execute the command
make installto initialise the Docker image
Once you’ve done that, you can start and stop the Docker container hosting the demo site with the commands make up and make down, and you can see the Jekyll logs with the command make logs.
You’ll need to do a fresh make install each time you download a fresh copy of the repo.
Housekeeping — Change to Local Jekyll Installation Instructions in PBS 177
If you’d rather not go down the Docker route and prefer to keep using your OS’s own copy of Ruby, please note that the instructions for doing so in instalment 177 have needed to be updated to continue to work in October 2026.
If you are still using the same computer you were using before the hiatus, your setup should continue to work just like before, but if not, you’ll need to follow the updated instructions to get Jekyll to work for you on your local machine.
Allison discovered this problem on her fresh installs of macOS 27 and was able to track it down to a breaking change in one of Jekyll’s dependencies. The solution is to peg the dependency to the last version before the breaking change with the command:
bundle add json --version "< 2.8.0"
PBS 181 Challenge Solution
Before we took our break from the Jekyll mini-series, way back in instalment 181, we ended with a challenge.
As a reminder, we have been using a separate GitHub repository to track the demo Jekyll site we’re building throughout the series. Each important point in our journey has been marked with a tagged commit, so you can download the code at the relevant point in the series from the repo’s tag listing. You can also fork the repo, clone it to your own device, and check out the relevant tagged commits as needed.
The starting point for this challenge was the commit tagged pbs181-challenge-startingPoint.
In PBS 181, we learned to create reusable snippets that can act as template-like additions to the regular markdown in our content files. The challenge was to create such a reusable snippet for adding sidenotes to our content. There were just three criteria:
- The snippet needs to receive its contents as an argument named
content. - Markdown within note contents should be rendered to HTML.
- The note should be rendered using a Bootstrap 5 card.
To get a very basic working solution, create a file named ./docs/_includes/note.html and add the following content
<div class="card text-bg-light">
  <div class="card-body">
    <div class="card-text">{{ include.content | markdownify }}</div>
  </div>
</div>
This is all we need to define a reusable snippet that adds a basic Bootstrap card with one placeholder named content.
As a refresher, Jekyll’s term for reusable snippets is includes, and within an include you access the values passed to the snippet by prefixing argument names with include.. So, the argument named content is available as include.content.
Because our snippet needs to render Markdown correctly, we need to pipe the value we receive through Jekyll’s markdownify Liquid filter.
To use the new snippet, add the following to the end of index.md (leaving a blank line above it):
{% include note.html content="This site has no *useful* content, it's all just filler!" %}
Allow the site to rebuild, and you should see the note appear under the front page’s content. Notice that the word useful is in italics, proving Markdown rendering is working as expected.
That’s it — that’s all we needed to do for full credit!
But there was some bonus credit on offer, so let’s try to earn that!
The first bonus challenge was to add an optional title to the card. To do that, we’ll use a new argument named title which we’ll need to treat as optional. That means we need to add a conditional section to our card. Update your note.html file to the following:
<div class="card text-bg-light">
  {%- if include.title %}
  <div class="card-header">
    {{ include.title }}
  </div>
  {%- endif %}
  <div class="card-body">
    <div class="card-text">{{ include.content | markdownify }}</div>
  </div>
</div>
By wrapping our header inside {% if %} statement we ensure it only appears when a title is actually specified.
Before adding a title, let the site rebuild and verify that the note remains unchanged.
Now, to add a title, edit the {% include %} statement in index.md to become:
{% include note.html title="Note" content="This site has no *useful* content, it's all just filler!" %}
Allow the page to rebuild, and notice that our note now has a title telling us it’s a note.
The final extra challenge was to add an optional link for more information.
This doesn’t introduce any new concepts; it just involves applying the same principle again. Update your note.html to the following:
<div class="card text-bg-light">
  {%- if include.title %}
  <div class="card-header">
    {{ include.title }}
  </div>
  {%- endif %}
  <div class="card-body">
    <div class="card-text">{{ include.content | markdownify }}</div>
  </div>
  {%- if include.info_url %}
  <div class="card-footer text-end">
    <a href="{{ include.info_url }}" class="card-link" target="_blank">more …</a>
  </div>
  {%- endif %}
</div>
Now, to add a link, edit the {% include %} statement in index.md to become:
{% include note.html title="Note" content="This site has no *useful* content, it's all just filler!" info_url="https://typography.guru/video/the-unsolved-mystery-of-lorem-ipsum-r151/" %}
Allow the page to regenerate, and notice that there’s now a footer on the note with a link for more information.
The demo site with the solution merged in is available via the tagged commit pbs181-challenge-solution
Some Housekeeping — Bootstrap 5.3 Upgrade
Before we move on to making some more changes to our demo site, I took the time to repeat the instructions for installing Bootstrap from instalment 177 to move the demo site to Bootstrap 5.3.8 (the most recent release as of when this instalment was written).
Playing Along with this Instalment
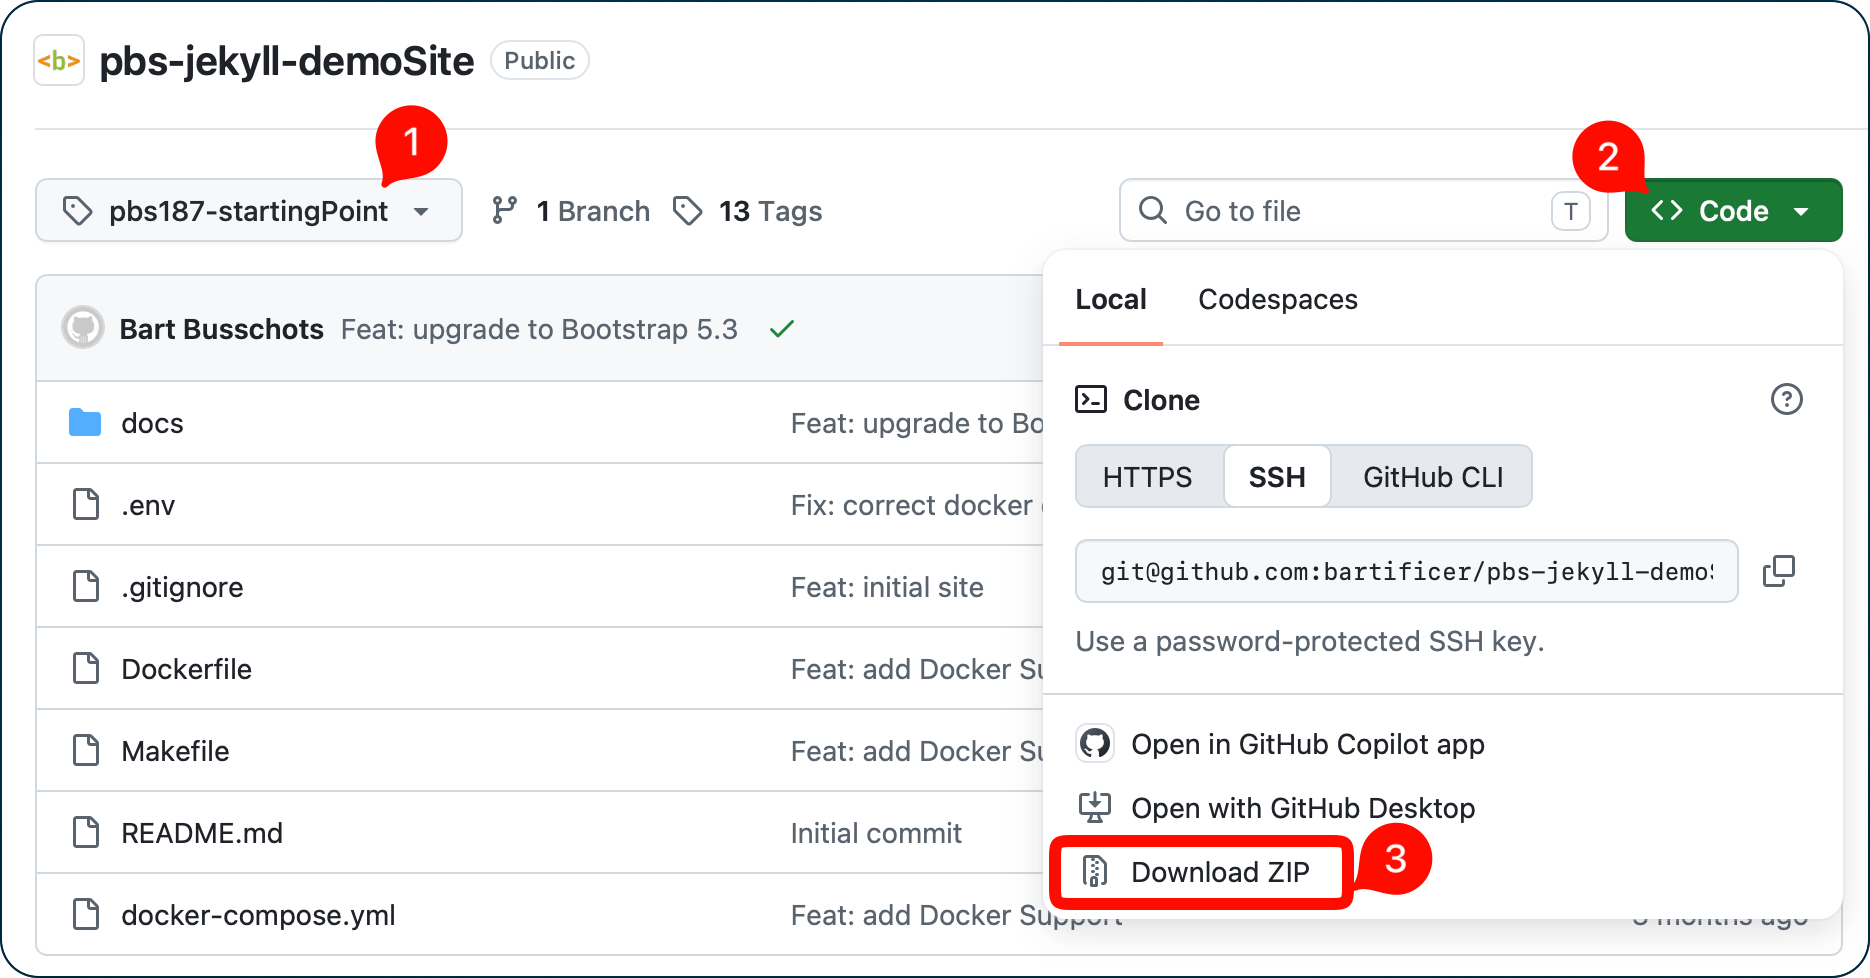
If you’d like to work through our changes on your own copy of the code, the starting point for the examples today is the commit for the demo site tagged as pbs187-startingPoint. From there, click on the green <> Codebutton and select Download ZIP from the dropdown.
Adding Metadata to the Demo Site
Since we last discussed Jekyll in instalment 181, we have learned about the HTML metadata tags for SEO and the OpenGraph in instalment 186. Before moving on to learn new things, we should take some time to incorporate that new knowledge into our demo site.
For some of the headers, we’ll use the same value on all pages on the site, and for others we’ll use page-specific values. Because we don’t want to hard-code data into layouts, we should try to source the content for the tags from appropriate variables.
For now, we’ll keep things simple and implement just the basic headers.
Site-wide Headers
The most sensible information source for values that don’t change from page-to-page is the Jekyll configuration file (./docs/_config.yml). Any values defined in that file are available in our layouts as site.*.
To avoid our settings file becoming cluttered, we’ll collect the metadata-header-related values in a new dictionary we’ll name meta.
| Description | Header | Source |
|---|---|---|
| Site Name | OpenGraph: og:site_name |
site.title (a standard Jekyll setting, so already defined) |
| Content Author | SEO: author |
site.meta.author |
| Language | OpenGraph: og:locale |
site.meta.locale |
| Site Builder | SEO: generator |
Hard-code this header to Jekyll |
| OpenGraph Content Type | OpenGraph: og:type |
site.meta.og_type |
| Social Media Card Image | OpenGraph: og:image |
site.meta.og_image |
Page-Specific Headers
For the headers that change from page-to-page, the best place to store the values is the front matter on the pages themselves. That means that within our layouts we’ll access the values as page.*.
We’ll use as many standard Jekyll page properties as we can, and again, for clarity, we’ll collect any additional values we need to capture in a dictionary named meta.
| Description | Header(s) | Source |
|---|---|---|
| Page Title | OpenGraph: og:title |
page.title |
| Page Description | SEO: description & OpenGraph: og:description |
page.meta.description |
| Page URL | OpenGraph: og:url |
page.url |
Add The Headers to the Layout
Now that we’ve decided on the headers we want to publish and their matching sources, the next question is where best to insert them into our theme.
We currently have two layouts: the default one (./docs/layouts/default.html), and a dedicated layout for the front page (docs/_layouts/front_page.html). We need to add these headers within the HTML <head> tag, but we don’t want any code duplication.
Examining both layouts, we see that they both include the same reusable snippet, html_head_common.html, so this is clearly the most appropriate file to insert the headers into.
As a naïve first attempt, add the following to the bottom of ./docs/includes/html_head_common.html:
  {%- comment %}Add the SEO & OpenGraph meta tags{% endcomment %}
  <meta property="og:site_name" content="{{ site.title }}">
  <meta name="author" content="{{ site.meta.author }}">
  <meta property="og:locale" content="{{ site.meta.locale }}">
  <meta name="generator" content="Jekyll">
  <meta property="og:type" content="{{ site.meta.og_type }}">
  <meta property="og:image" content="{{ site.meta.og_image | absolute_url }}">
  <meta property="og:title" content="{{ page.title }}">
  <meta name="description" content="{{ page.meta.description }}">
  <meta property="og:description" content="{{ page.meta.description }}">
  <meta property="og:url" content="{{ page.url | absolute_url }}">
Note that the values for both og:image and og:url are piped through the absolute_url filter to convert them from paths within our Jekyll folder to full URLs.
Allow the site to build, and check the headers on the resulting home page:
  <meta property="og:site_name" content="PBS Jekyll Demo Site">
  <meta name="author" content="">
  <meta property="og:locale" content="">
  <meta name="generator" content="Jekyll">
  <meta property="og:type" content="">
  <meta property="og:image" content="">
  <meta property="og:title" content="Home">
  <meta name="description" content="">
  <meta property="og:description" content="">
  <meta property="og:url" content="http://0.0.0.0:4000/">
Because we haven’t added our own meta dictionary to the site config or any of our pages, lots of the headers have no values. This is very realistic, because reusable layouts are generally designed to support as many headers as possible, leaving the decisions on which headers to use to the site owners. To avoid the headers we’ve not defined values being rendered with blank values we need to wrap the headers within {% if %} statements.
Replace the code above with the following updated code:
  {%- comment %}Add the SEO & OpenGraph meta tags{% endcomment %}
  <meta property="og:site_name" content="{{ site.title }}">
  {%- if site.meta.author %}
  <meta name="author" content="{{ site.meta.author }}">
  {%- endif %}
  {%- if site.meta.og_locale %}
  <meta property="og:locale" content="{{ site.meta.og_locale }}">
  {%- endif %}
  <meta name="generator" content="Jekyll">
  {%- if site.meta.og_type %}
  <meta property="og:type" content="{{ site.meta.og_type }}">
  {%- endif %}
  {%- if site.meta.og_image %}
  <meta property="og:image" content="{{ site.meta.og_image | absolute_url }}">
  {%- endif %}
  <meta property="og:title" content="{{ page.title }}">
  {%- if page.meta.description %}
  <meta name="description" content="{{ page.meta.description }}">
  <meta property="og:description" content="{{ page.meta.description }}">
  {%- endif %}
  <meta property="og:url" content="{{ page.url | absolute_url }}">
Allow the page to regenerate, and now we have better headers:
  <meta property="og:site_name" content="PBS Jekyll Demo Site">
  <meta name="generator" content="Jekyll">
  <meta property="og:title" content="Home">
  <meta property="og:url" content="http://0.0.0.0:4000/">
We still have a problem though — our Open Graph page titles are not actually very good! As the title text on a social media link card, ‘Home’ is pretty useless!
We need to add the site title to the page title to add some context. Replace the line that generates the og:title header with the following updated version:
<meta property="og:title" content="{{ site.title }}: {{ page.title }}">
Allow the page to generate again, and now we have a meaningful title:
<meta property="og:title" content="PBS Jekyll Demo Site: Home">
The next step is to add the missing data so the remaining supported headers appear.
Add the Site-wide Extra Data
Let’s start with the headers whose value doesn’t change from page to page. These headers are populated from the site.meta variable, so add something like the following to the end of ./docs/_config.yml:
# Set the site-wide SEO and OpenGraph metadata
meta:
  author: Bart Busschots
  locale: en_IE
  og_type: website
We’re still missing one header value, though: an image to use for the social media link cards (og:image).
In the real world, we would spend some time crafting an image that meets the current best practices for this kind of use (as of this year, my research led me to choose 1,200x630px PNGs), but let’s keep things simple and reuse the graphic from the front page — ./docs/assets/siteIllustration.png.
Add the following to the end of the meta dictionary:
og_image: assets/siteIllustration.png
You’ll notice that after allowing the site to rebuild automatically, these headers did not get updated in our browser. This is because the Jekyll config file is not monitored by Jekyll’s watch mode. Jekyll only loads the config file once, when it initially starts. This means that we need to completely stop and restart Jekyll to see the effects of our changes. If you’re using Docker, that means running make restart.
We now get our expected headers:
  <meta property="og:site_name" content="PBS Jekyll Demo Site">
  <meta name="author" content="Bart Busschots">
  <meta name="generator" content="Jekyll">
  <meta property="og:type" content="website">
  <meta property="og:image" content="http://0.0.0.0:4000/assets/siteIllustration.png">
  <meta property="og:title" content="PBS Jekyll Demo Site: Home">
  <meta property="og:url" content="http://0.0.0.0:4000/">
Populate the Page-Specific Headers
The page-specific data is read from the front matter on the individual pages, so to test our tags, add the following to the end of the front matter in ./docs/index.md:
meta:
  description: The landing page for a demo website with no meaningful content!
Allow the site to rebuild, and notice the following two headers have now been added:
  <meta name="description" content="The landing page for a demo website with no meaningful content!">
  <meta property="og:description" content="The landing page for a demo website with no meaningful content!">
For completeness, add the following to the front matter in ./docs/about.md:
meta:
  description: An explanation of the PBS Jekyll demo site.
And the following to the front matter in ./docs.links.md:
meta:
  description: A list of links that might be useful when developing a Jekyll site on GitHub Pages.
Organising our Content
We’ll wrap up this instalment by laying some groundwork for the remainder of the series.
Our focus is now shifting from controlling how our sites look to organising the content our sites publish. In other words, to use the appropriate jargon, information architecture.
I asked Lumo to give me a short, pithy description of what that means for a content management system, and the essence of the response was excellent:
“… structuring, organizing, labeling, and connecting content so that users can find what they need and authors can manage it efficiently — essentially the blueprint for how information lives, relates, and flows within the system …” — Lumo AI
The fundamental building blocks for information architectures are taxonomies.
I also asked Lumo for a short description of this piece of jargon:
“Taxonomy is a structured system for classifying and categorizing content using shared terms—like categories, tags, or custom fields.” — Lumo AI
Jekyll Taxonomies
Since we’re working in Jekyll, we’ll focus on the different taxonomies Jekyll supports.
Jekyll’s default taxonomy is the one we have been using to date: pages. Markdown files placed into folders that don’t start with an underscore (_) are pages.
Jekyll supports blogging with the built-in posts taxonomy. We’ll look at this in detail in the next instalment, but for now, you’ll recognise blog posts as markdown files under the special _posts folder.
Jekyll allows you to define your own content types using collections. These are simply custom site-specific taxonomies you design yourself.
Putting it all together, you have the following information architecture tools at your disposal:
| Taxonomy | Description | Use Case |
|---|---|---|
| Pages | The default taxonomy, contains all markdown files not associated with another taxonomy. | Generic pages about a specific topic that don’t evolve. For example, your front page, about pages, and contact pages. |
| Posts | Pages associated with specific dates. | Blog posts, new items, etc. |
| Collections | Site-specific taxonomies. | Any related collections of content that are not pages or posts, for example, author profiles. |
In addition to these top-level taxonomies, Jekyll also provides two additional sub-taxonomies which can be used across any of the top-level taxonomies. Specifically, categories and tags.
| Sub-Taxonomy | Description |
|---|---|
| Categories | Each piece of content can only be assigned to a single category, so they are intended for high-level content groupings, like separating recipes from opinion pieces, etc. |
| Tags | Each piece of content can have arbitrarily many tags, so they are intended for more fine-grained groupings, and groupings that span across multiple categories or even multiple taxonomies. |
Out of the box, Jekyll’s collection and tagging features are quite limited when compared to dedicated blogging platforms like WordPress. There are plugins that can be added to bring the desired missing features, but they come with a big caveat — they don’t work with the default GitHub Pages setup. That doesn’t mean you can’t use them with GitHub Pages, but it means that to use them you need to develop your own custom GitHub action to run Jekyll, rather than relying on GitHub’s default action.
The two biggest caveats are:
- Jekyll has one flat list of categories; they can’t be nested
- Jekyll doesn’t natively auto-create a listing of pages for each existing category or tag, but this functionality can be added using the jekyll-archives plugin.
Over the next few instalment we’ll learn how to use these taxonomies to put structure on our information.
Final Thoughts
Now that we understand how Jekyll goes about organising content, we’re ready to explore the posts and collections taxonomies. We’ll start in the next instalment by exploring how the posts taxonomy is used to blog with Jekyll.