PBS 100 of X: Time Sharing Challenge Solution
At the end of instalment 96 I set a challenge with the intention that it be a long-running thing that people get to put a lot of time and energy into. The idea was to build a real web app that solved a real problem.Specifically:
Two podcasters live in different parts of the world, they need to communicate show recording times without the need to do mental arithmetic. Provide a web app that can share a specific time across timezones. The time being communicated should be embedded in the URL somehow so it doesn’t need to be typed in by the recipient.
All details were intentionally left open. You could design any UI you liked, use any libraries you liked, and code using any paradigm you liked.
Because this challenge was so open, I hoped Allison would design something dramatically different to what I came up with, and my hopes were fulfilled! So, because our two solutions are so different, we’ll divide this instalment between the two.
The intention here is not to go through our solutions in detail, the code is available for you to peruse at your leisure, but instead, to discuss our designs, how we went about solving the problem, and any important points of learning.
In my solution I’ll be focusing on two new concepts — URL manipulation, and cookies. In this case I used both in a purely client-side application, but these technologies are much more commonly used in client-server applications, so we’ll be circling back to both in great detail in future instalments. This is just a teaser with a purely JavaScript flavour if you will 🙂.
Instalment Resources
This instalment describes the following sample solutions:
- Download ZIP File
- View source code online at GitHub
- View the Web Apps in your browser:
Matching Podcast Episode
Listen along to this instalment on episode 651 of the Chit Chat Across the Pond Podcast.
You can also Download the MP3
Bart’s Solution
As you could probably guess from the wording of the challenge, I set this as a challenge because I wanted to solve this problem for myself, and, because I thought it just might be something of use to the wider world. To that end I approached this as a development project for a real-world web app.
My solution is live on the web as a free service anyone can use at this-ti.me.
Bart’s Design
I thought of the problem as a game of two halves – you need a UI for generating the links to share a time, and a UI for showing recipients the time that was shared with them. I chose to break those two tasks into two separate tabbed panes. My thinking was that it’s very rare for someone to want to do both of these things at the same time. You will be arriving at the site with a single goal, to send or receive, so you shouldn’t be overloaded with a second UI that’s of no interest to you in that moment.
When a user arrives at the bare URL, i.e. there is no shared time encoded in the URL, the sharing tab is active, and the shared tab simply does not exist.
When a user arrives via a share link the shared tab both exists, and, is automatically selected. The tab for sharing a time is there, so those users can choose to share a time if they’d like, but in most situations, they’ll just note the time, and move on with their lives.
There is one relatively common situation where someone is likely to want to receive and send — when they want to suggest an alternative time. To that end, I added a little intelligence to the default date and time pickers in the sharing tab. If you arrive at the bare URL the default date is today, and the default time is the next hour. That’s a reasonable starting point for the date picker which will show the current month, and the time picker which has arrows for nudging the time up and down. However, if you arrive via a shared link, the share tab will default to the originally shared time shown in your timezone. This makes it easy to nudge the time forward or back by a few days or hours, and then hit the button to generate a new share link to send back!
Whether you are sending or receiving, it’s vital the UI is showing you times in your timezone, so, the information about you is always needed, and should always be in view. While I wanted the user to always see their timezone, I didn’t want them to have to change it any more than necessary. To that end I default the timezone to the locale provided by the browser. Most browsers ask the OS for their locale, and most people’s OSes are configured correctly so users see the right time in the menubar/system tray, so most of the time that will work fine. People who travel a lot may find themselves needing to change the setting more often though.
To make shared links friendlier I also chose to let users enter their name into the About You card.
Once I chose to let people enter their name it seemed like hassle to make people re-enter it each time they visit the site. To that end I wanted to provide a mechanism for saving the name and timezone without building a server back-end with account management and all that. Since the site already uses URLs to encode data, I chose to allow people to generate a personal URL. This would encode their data, not a shared time, and arriving at the site from such a URL would default to the sharing page, not the shared page, and would pre-fill the About You tab from the data embedded in the URL. The idea is that users would bookmark their custom URL rather than the bare URL.
While custom URLs are a solution, they involved users bookmarking or otherwise saving a link, and lots of people don’t do that anymore! So, I chose to also allow the data to be saved into a browser cookie. A cookie is simply a piece of data attached to a site that the browser remembers and makes available next time you browse to that same site.
I was reminded of two important lessons building the UI for the About You card:
- Placement matters — I first had it on the left, and because we westerners read left to right, that made it appear more important than the shared time — do’h!
- Advanced features can be distractions — while the saving functionality will be very useful to those who want it (like me), the fact that it has a button for generating a shared link makes it inherently confusing. Which link should I share? Why are there two similar buttons?
Inspired by Allison I chose to use Bootstrap’s Collapse plugin to hide the save UI by default, and have it expand and collapse via a Save button.
Embedding Data in the URL
Data can be encoded in URLs by adding a so-called query string at the end of the URL. The query string is separated from the rest of the URL with a ? character, and it consists of one of more name-value pairs separated from each other with & characters. Each name-value pair has a name separated from the value by an = character.
So far so good, it’s complicated to say, but when you look at basic query strings they’re actually easy to interpret. Consider the following fictitious URL:
https://come.domain/some/path?lang=en¤cy=eur
The query string is everything after the ?, so simply lang=en¤cy=eur. It seems obvious it encodes two name-value pairs, probably representing a language and a currency based on the naming.
The reason this example looks so simple is that none of the names or values contain any special characters! Just about everything other than unaccented letters and digits needs to be encoded to be used in any part of a URL, including the query string. The encodings take the form of the % symbol followed by two hexadecimal digits. You can see this in the following genuine URL from my sample solution:
https://this-ti.me/?uts=1598738400&tz=Europe%2FDublin&name=Bart
Here the query string is uts=1598738400&tz=Europe%2FDublin&name=Bart and it encodes three variables, one named uts which contains a unix time stamp representing the shared time, one named tz containing the timezone, and one named name containing the name of the person who shared the time. Neither the timestamp nor the name contain any special characters, but the timezone does, it contains a forward slash. As you can see, that forward slash was replaced with the URL encoding %2F.
If you’re curious you can find a full list of the encodings on the W3 Schools site, but thankfully you should never have to handle them directly in your own code. Instead, you should use APIs to take care of that for you.
In standard JavaScript the most relevant functions are encodeURI(), encodeURIComponent(), decodeURI(), and decodeURIComponent().
JavaScript also allows you to access the URL of the current page with window.location.href.
So, using the built-in JavaScript functions and some regular expressions you could definitely write your own code for interpreting and creating URLs with encoded data. However, you’ll end up getting quite cranky, because it’s fiddly code to write, and you’ll probably make mistakes!
This is why I chose to use URI.js for processing and creating URLs.
With URI.js you can build an object representing the current URL by simply calling the constructor with no arguments:
const myURL = new URI();
You can then access the parts of that URL using the various functions provided by the URI.js API. Of particular interest for this instalment is .query(true) which returns the query string as a dictionary of decoded name-value pairs. I use this in my solution to read the URL data like so:
const rawURLInfo = (new URI()).query(true);
The API also lets me replace the entire query string with a new collection of name-value pairs by passing a dictionary as the argument to the same function. Finally, the .toString() function will render the URL.
If you open a JavaScript console on my sample solution you can play around with this API:
const myURL = new URI();
myURL.query({ codeWord: 'boogers', emoji: '💩'  });
console.log(myURL.toString());
That should log the URL https://this-ti.me/?codeWord=boogers&emoji=%F0%9F%92%A9;
Warning — Always Validate URL Data
URLs can be altered by anyone, so never ever ever trust the data in a URL. Always validate it to be sure it contains what you expect!
Basically, treat URL data like you would text entered into a text box in a form. Make no assumptions, and validate the data thoroughly before using it.
To illustrate the point, here’s the code for loading the URL data in my sample solution:
//
// -- extract data from URL
//
const rawURLInfo = (new URI()).query(true);
if(rawURLInfo.uts && rawURLInfo.tz){
	let allOK = true;
	if(!isUTS(rawURLInfo.uts)){
		console.warn('Invalid UTS in URL', rawURLInfo.uts);
		allOK = false;
	}
	if(!isIANATimezone(rawURLInfo.tz)){
		console.warn('Invalid Timezone in URL', rawURLInfo.tz);
		allOK = false;
	}
	if(allOK){
		URL_DATA.timeShared = true;
		URL_DATA.uts = rawURLInfo.uts;
		URL_DATA.tz = rawURLInfo.tz;
		if(rawURLInfo.name){
			URL_DATA.name = sanitiseName(rawURLInfo.name);
		}
	}else{
		logProblem('Ignored invalid data in URL', false);
	}
}
if(rawURLInfo.mytz){
	if(isIANATimezone(rawURLInfo.mytz)){
		URL_DATA.mytz = rawURLInfo.mytz;
	}else{
		logProblem('Ignored invalid saved timezone in URL', false, `Invalid TimeZone: ${rawURLInfo.mytz}`);
	}
}
if(rawURLInfo.myname){
	URL_DATA.myname = sanitiseName(rawURLInfo.myname);
}
The naive approach would be to simply write:
URL_DATA = (new URI()).query(true);
But notice how much validation and sanitisation is needed to safely read just five possible values!
Using Cookies
Cookies are name-value pairs associated with specific websites that your browser stores locally on your computer. A website can tell a browser to store a cookie, and the next time that same site is visited, the browser will re-load that cookie.
Cookies come in a few different assortments (no white chocolate & cranberry ones though 🙁) — cookies can be flagged as secure meaning they’ll only be made available if the site is visited over HTTPS, and cookies can be temporary or semi-permanent. By default, cookies are only to be retained until the user quits the browsers. These are referred to as session cookies. However, cookies can be marked for longer-term retention and given an explicit time-to-live in the form of a number of days.
I’ve been intentionally vague about the scope of a cookie, using the hand-waving term site, but it’s actually more complicated than that. When setting a cookie you can associate it with a specific folder path within a site, or, with specific sub-domains of the site. None of this is relevant for this simple example, so I’ll leave it as an exercise for the reader to learn more if you like — the docs on the MDN are a good starting point.
Cookies were invented to allow web servers to tell browsers to store information on their behalf. The browser is then expected to hand that data back to the server in all subsequent HTTP requests. This means that most cookies are actually set by web servers using HTTP response headers, and passed back to servers using HTTP request headers. When cookies were invented web pages were static, there was no such thing as client-side code. I.e., there was no JavaScript!
Now that we have JavaScript we can set and read cookies entirely within the browser, no HTTP headers needed! The key to this is the build-in JavaScript getter/setter document.cookie.
Warning — Always ValidateCookie Data
While it’s a little harder for a user to alter the value stored in a cookie than it is to alter a URL, it’s actually very easy to do once you learn how. A quick search for ‘edit cookies’ in your search engine of choice will soon point you in the right direction 🙂
So, just like with data encoded in URLs, always treat cookie data like you would text entered into a text box in a form. Make no assumptions, and validate the data thoroughly before using it.
Accessing Cookies via JavaScript
Unfortunately, document.cookie provides a very simplistic API that forces you to manually encode your cookies as if they were HTTP headers. This involves a fairly complex syntax, and the needed for encoding and decoding of special characters.
At this stage it’s probably no surprise that the open source community has come to the rescue and addressed this very common developer pain-point. By far the most popular and well maintained open source JavaScript library for managing cookies is js-cookie, so that’s what I chose to use.
The API for creating a cookie is very simple, simply call Cookies.set() with the name as the first argument and the value as the second. If you just want a default session cookie that’s all you need to do. To create a semi-permanent cookie you need to use the optional third argument, a dictionary of options, and the option you need is expires where the value is the number of days the cookie should be held for.
As an example, this is my code for saving the user’s timezone and name into cookies named mytz and myname:
function saveCookies(){
	// validate the data
	const tz = myIANATimezone();
	if(!isIANATimezone(tz)){
		logProblem('Failed to save cookie, invalid timezone.', false, `invalid timezone: ${tz}`);
		return;
	}

	// write the cookies
	Cookies.set('mytz', tz, { expires: COOKIE_TTL });
	COOKIE_DATA.mytz = tz;
	const name = myName();
	if(name){
		Cookies.set('myname', name, { expires: COOKIE_TTL });
		COOKIE_DATA.myname = name;
	}else{
		Cookies.remove('myname');
		delete COOKIE_DATA.myname;
	}
	console.info('saved personal info to cookie:', COOKIE_DATA);

	// update the cookie display
	updateCookieDisplay();
}
Reading the values for cookies is also very straight forward, simply use the Cookies.get() function. If you don’t pass any arguments the function will return a dictionary with all the cookies for the site, and if you just want a single specific cookie, pass its name as the first argument.
This my code for reading the values from the cookies:
//
// -- extract data from Cookies (and refresh if found) --
//
const rawCookieInfo = Cookies.get();
if(rawCookieInfo.myname){
	COOKIE_DATA.myname = sanitiseName(rawCookieInfo.myname);
}
if(rawCookieInfo.mytz){
	if(isIANATimezone(rawCookieInfo.mytz)){
		COOKIE_DATA.mytz = rawCookieInfo.mytz;
	}else{
		logProblem('Ignored invalid saved timezone in Cookie', false, `Invalid TimeZone: ${rawCookieInfo.mytz}`);
	}
}
updateCookieDisplay();
Again, notice how the naive approach would be to simply replace all that validation and sanitisation with:
COOKIE_DATA = Cookies.get();
Don’t be tempted by that shortcut!
Classes Nowhere & Everywhere!
I did not write a single class of my own for this web app. I simply adore object oriented programming, so it’s not like I was trying to avoid writing classes. So why didn’t I? Simple — other people had already written excellent classes to model all the data I needed to manipulate for this challenge, so why spend my time poorly re-inventing the proverbial wheel?
These are the most significant classes I imported:
- moment.js and it’s timezone extension for processing times and timezones.
- URI.js for processing and manipulating URLs
- js-cookie for processing browser cookies.
And while they might be fading into the background of our thoughts now, don’t forget that APIs like jQuery and Mustache are also object-oriented under the hood, even if they don’t always make that obvious. The same is true of my open-source array-joiner humanJoin.js which I also used in my solution.
One reason these OO solutions are not so obviously OO is that they make use of so-called factory methods rather than constructors. When you create a time object with moment.js you don’t use the
newkeyword, instead, you call themoment()function. That function returns an object that is an instance of a class encapsulated within the moment.js code. The object was created by a constructor, but that was done on your behalf by themoment()function. jQuery’s$()function behaves in the same way.
Allison’s Solution
Approach
Bart will be explaining how he started with his vision for the design and then he did the code behind the design. I started with my working clock from the previous assignment and worked on the code to accomplish the assignment first. The last thing I did was polish the design using feedback from the PBS channel in our Slack at podfeet.com/slack.
My working solution is available at podfeet.com/time-shifting-clock and the source code is available on github.com/….
My Starting Point
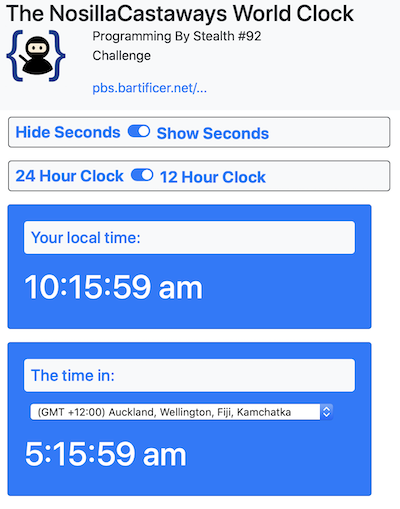
Our previous assignment was intended to work our muscles on creating a clock Class and then instances of that class. My design had the local time and a dropdown to see the current time in another location. It sported what I like to refer to as a giant drop down of doom (™Donald Burr) which pretty much everyone hated, including me. We also had been told to have an option to allow the user to view the times with 12 or 24 hour formatting.
Allison’s starting point with static, chooseable timezones:
Allison’s completed assignment with chooseable, time-shiftable, sendable clocks:
Getters and Setters
In the lessons leading up to the challenge, Bart taught us about getters and setters, and how they can be used to document what format the Instance attributes should be in as well as performing error checking. I started the assignment by creating all of the setters and getters for all of my Instance variables. I have to say that I found this task arduous, boring, and I could not see the point.
However, once I had this tedium completed, when I added a new Instance variable, I found that I really got the hang of why the getters and setters are there, and I found I got pretty good at thinking ahead of what errors could be introduced, which has been a blind spot of mine. More than once the error checking I wrote in the setters actually helped me find errors in my if/else statements where I have a core competency of writing them backwards!
Bootstrap Plugin for a Search Box Instead of a Dropdown
The first design change I needed to make was to get rid of the dropdown and Bart suggested an open source plugin written by Hoonatas called Bootstrap 4 Autocomplete. This plugin is very simply and elegantly written, and it combines the best of both worlds. You get a search box but as soon as you put in a specified number of characters, a dropdown is created on the fly. When you select a city from the dropdown, the dropdown is removed by the code.
Unfortunately, the way this plugin creates the dropdown it never announces itself to screenreaders. Normally we have code such as aria-haspopup="true" and aria-expanded="true" to tell screenreaders that the dropdown is there, but since it doesn’t exist until you start typing, the screenreader never knows it’s there.
Listener Helma and I have been working on a solution (mostly Helma) which we’ll give to Hoonatas when it’s ready.
If you do use this plugin, I’d suggest two things. In an sr-only put some text to tell the screenreader user to tab after typing a few characters and they’ll get to the dropdown. The second problem with the plugin is that by default the text in the dropdown is highlighted to show the match to what you typed. For example, if you type ‘det’ it will find Detroit, and highlight in color the letters ‘det’. A nice touch, but in order to highlight the text, the word must be split, so the screenreader user hears two words, ‘det’ and ‘roit’. The highlighting is of marginal value to the sighted user and a hot mess for the blind, so I’d suggest you set the attribute highlightTyped: false.
Starting Point
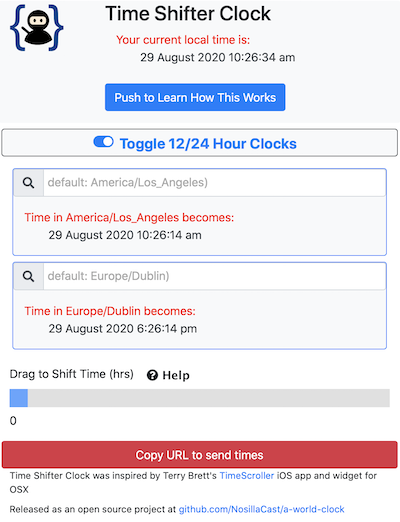
For ages I used a wonderful Dashboard Widget by Terry Brett called TimeScroller. The concept was to be able to choose a time in several timezones by dragging a scroller. With the demise of Dashboard Widgets in macOS Catalina, I decided to implement the same design concept. In order to not step on his toes, I called mine Time Shifter Clock and put a note on my app with a tip of the hat to Terry.
I created my time shifter by using an input type="range" and then found a CodePen by Yannic van Veen that demonstrated how to provide a number showing the number of hours the time shifter had been moved.
For my clock times, I decided to not just show the time in two cities, but also the day. I did this because it is not uncommon for me to work with people on the other side of the International Dateline, like New Zealand. If I just tell them the time, that isn’t enough information. Adding this was crucial to my testing and having people in other timezones (like New Zealand) revealed flaws in my logic that I was able to eliminate.
Building the URL
I found learning how to create a URL to be copied to be one of the most enjoyable parts of the project. I know Bart gave us a hit to look at a plugin, but I simply used the built-in Class URLSearchParams developer.mozilla.org/… which made it pretty easy. I combined that with the built in function window.location.search to get the parameters on the other end to populate the page.
I did have to get rid of the underscores in city names that come with moment.tz.names(), so I used a really simple regular expression to replace them with + before putting them in the URL and then strip them out on the other end. I had a problem at one point where between each of the different clocks in the URL I’d get maybe 20 +s instead of just one. Bart told me a joke about that. He said, “When you solve a problem with a regular expression, now you have two problems.”
Copy URL
When I first figured out the URL scheme part of the task, I had my code create an alert with a message followed by a long, ugly URL that the user had to select and copy. It wasn’t great, but worked … until I tried it in Chrome. Turns out Chrome doesn’t let you select the text in an alert!
My second solution is much more elegant. I created a button and attached a click handler to it. The click handler creates the URL string first, and then creates a dummy text input element containing the URL string, and gives the ext input an id of dummyText. I used a built-in command document.execCommand("copy") to put the URL into the clipboard. That’s all well and good, but then there’s this weird text box sitting around with selected text, why should the user have to worry their pretty little head about that? I used the built-in jquery function $('input').remove('.dummy') to remove the text box. I’m not sure why it works this way, but the user never even sees the input text box! I added an alert to tell them that they copied the URL successfully and suggest they send the URL to their colleague.
$('#copyBtn').click(function(){
	// create URL string
	 var dummyTextInput = $('<input>').val(sendableURL).attr('id',"#dummyText").attr('class', 'dummy').appendTo('#dummy').select()
    document.execCommand("copy");
    alert('Sendable times URL copied to your clipboard and ready to send to your colleague.')
    $('input').remove('.dummy')
}
Update — 8 September 2020
In the audio you’ll hear Allison describe her copy URL method with delight and then Bart break the news to her that
document.execCommand("copy")had been deprecated. After recording Allison (and independently Bart) found the superseding Clipboard APINavigator.clipboarddeveloper.mozilla.org/…. This new API allowed her to eliminate the creation of the dummy text box and simply copy the sendable URL directly. Her command is:navigator.clipboard.writeText(sendableURL) .then(() => { // Success! }) .catch(err => { console.log('Something went wrong', err); });Bart suggests that adding an async and awake would be cleaner coding style than the old
.then.catch()approach, but this method does work in modern browsers, but not in Internet Explorer.
Interface Improvements
When I had everything working, it was time to polish the design. I solicited feedback from our Programming By Stealth Slack community podfeet.com/slack and got a lot of great suggestions.
My goal was twofold: create an interface that fit on a single screen on mobile and yet had explanations of what this tool was supposed to do. It’s the second part that makes the first part so hard to accomplish. The concept of time shifting isn’t a natural thought for most people and it’s easy to write way too much about it that no one will read.
My first attempt was to put a couple of Font Awesome information symbols on the page and have the user hover over them to get more information. While this worked passably well on the desktop, it was disastrous on mobile. On an iPhone held in portrait orientation, touching one of the icons would pop the information up and it would instantly disappear. Oddly with the phone in landscape it worked just fine.
Marianne in our Slack suggested I change hover to click and that worked great! Except that the popup covered up the icon so there was no way to dismiss it.
Then I remembered Bart teaching us about Bootstrap Collapse. I created a giant red button that says “Push to learn how this works”. It’s lovely because it has all the info you need but gets out of the way when you don’t need it. Even better, it works on every platform quite elegantly.
<button class="btn btn-primary" type="button" data-toggle="collapse" data-target="#explanationText" aria-expanded="false" aria-controls="explanationText">
  Push to Learn How This Works
</button>
<div class="collapse" id="explanationText">
  <div class="card card-body">
    <p>The purpose of this clock is to take the guess work out of telling someone in another time zone what time you want to meet. </p>
    <p> Search for your own city and your partner's city and drag the shifter until you see the time you like and then hit the copy URL button.</p> <p>Send the URL to your partner and they'll see the exact times you've chosen. In turn they can offer an alternate time by using their own time shifter.</p>
  </div>
</div>
Observations/Philosophical Questions
While this assignment was a great learning experience on how to create a Class and then Instances of that class, it felt like a lot of overhead for only a couple of clocks. It seems maybe there’s a lower limit where a Class and Instances aren’t worth the trouble?
I found that there were certain functions that really seemed like they should be Instance functions but for the life of me I could not get them to work inside the Class definition. For example, changing the clocks to reflect a newly-chosen city was a function I had to have outside of the Class. That means I have two nearly identical functions, one for each clock. That smells bad but I couldn’t find any other way.
$('#sbsearchClock1').autocomplete({
      source: tzNamesObject, // dictionary object with the values from which to search
      onSelectItem: onSelectItem1, // callback to run when item is selected
      highlightTyped: false, // if typed text is highlighted in search results, the name gets broken in two for screen readers. e.g. "Det roit"
      treshold: 3 // minimum characters to search before it starts displaying
  });
  $('#sbsearchClock2').autocomplete({
      source: tzNamesObject, // dictionary object with the values from which to search
      onSelectItem: onSelectItem2, // callback to run when item is selected
      highlightTyped: false, // if typed text is highlighted in search results, the name gets broken in two for screen readers. e.g. "Det roit"
      treshold: 1 // minimum characters to search before it starts displaying
  });
Final Thoughts
When I set this challenge my intention was to subtly deliver three messages:
- The hardest part of developing any real-world app is figuring out the user interface. Humans are strange and unpredictable beats with very little patience. Creating an interface that they’ll grok before they get bored or frustrated is really bloody hard!
- At this stage in the series we’ve all built up a large collection of coding skills. We know about many different concepts and techniques, so when it comes to solving any problem it’s about choosing the best concept or technique for the problem. Its absolutely not about always using the same concepts and techniques regardless of the problem.
- It’s not just OK to go read the manual, it’s the only way to write production-quality code! There is no way any developer can remember every subtly of every first or third party API. It’s much quicker and easier to check the docs than it is to guess and debug!
For now, we’re drawing a line under client-side web development. We will return to it later in the series, but before we do that we need to switch our focus to the other half of the web infrastructure — the web server. All the code we’ve written thus far has been executed by our browsers, i.e. by the clients. We’ve simply treated web servers are file stores. Sure, web servers can store and serve static files, but, they can do so much more than that, and that’s what we need to learn about next.
Client-side web development is somewhat unusual because there are very few language choices you get to make. The markup language is HTML, all you get to choose is which version you’ll target, HTML 4 for maximum backwards compatibility, or HTML 5 for the cool new features. Similarly, when it comes to styling your pages and web apps you have to use CSS, your only real choice is whether to go for maximum backwards compatibility with CSS 2, or to embrace the future with CSS 3. Finally, the only scripting language at our disposal is JavaScript. We just have to choose whether we confine ourselves to older versions of the language like ES5, or whether we embrace ES6, 7, or even 8.
Really, the only choices we get to make are the third-party libraries and frameworks we choose to layer on top of the three client-side languages. In this series we’ve relied very heavily on two such frameworks — jQuery and Bootstrap. We’ve also made occasional use of other common third-party libraries like moment.js for date and time processing, is.js for data validation, and numeral.js for number formatting.
Things are an order of magnitude more complicated on the server, because first you get to choose your language, and then, you get to choose from a whole plethora of language-specific libraries and frameworks! We could have chosen to use JavaScript on the server-side too, but because this series aims to teach coding as a generic skill, not mastery of a specific language, I chose to use the switch to the server side as an opportunity to throw a new language into the mix. Once I made the decision not to use JavaScript, the choice of server-side language became easy because the community spoke with a loud and clear voice — we want to learn the single most popular server-side language, PHP!
So, starting in the not-too-distant future, we’ll be re-learning all the programming concepts we learned through JavaScript through PHP. It will becomes obvious that the same skills can be deployed in any language, you just need to learn a different syntax for achieving the same ends.
But, before we do any of that, we need to take a break and familiarise ourselves with one of the most important tools in the developer’s toolkit — source control. As our projects have continued to expand, the need for the ability to create named versions of our code, and to revert changes has hopefully become ever clearer. My hope is that those of you following along with the challenges have now realised you have a problem, and, as a result, will be well motivated to learn about one of the solutions to that problem — the open source GIT versioning system.
We’re going to spend an as yet undefined number of instalments learning what GIT is, what it can do, and how we can use it to manage our code. We’ll also learn about one of the most popular platforms making GIT available to the masses for free — GitHub, and we’ll learn to use some popular open source GIT GUIs.