PBS 42 of X: Playing the Game of Life
In this instalment it’s finally time to bring our Cellular Automaton prototypes to life by implementing Conway’s Game of Life. By the end of this instalment we’ll have reached a real milestone — our first web app! Granted, it won’t be a very feature-rich web app, but you have to start somewhere!
As usual, I’ve collected the code files for this instalment into a ZIP file which you can download here or here on GitHub. As well as the ZIP file, I’ve also published a tagged release of the bartificer.ca.js code on GitHub which you’ll need for this instalment’s challenge.
Matching Podcast Episode 507
Listen Along: Chit Chat Across the Pond Episode 507
You can also Download the MP3
PBS 41 Challenge — Sample Solution
I used the file pbs40.html from the ZIP file for instalment 40 as my starting point for the challenge.
The first change I made was to add a star rating field:
<label id="avg_rating_lbl">Average Review Rating</label>
<span id="avg_rating_ui" role="radiogroup" aria-labelledby="avg_rating_lbl">
    <span class="fa fa-star-o" id="avg_rating_1" data-stars="1" title="1 star" role="radio" aria-checked="false" aria-label="1" tabindex=0></span>
    <span class="fa fa-star-o" id="avg_rating_2" data-stars="2" title="2 stars" role="radio" aria-checked="false" aria-label="2" tabindex=0></span>
    <span class="fa fa-star-o" id="avg_rating_3" data-stars="3" title="3 stars" role="radio" aria-checked="false" aria-label="3" tabindex=0></span>
    <span class="fa fa-star-o" id="avg_rating_4" data-stars="4" title="4 stars" role="radio" aria-checked="false" aria-label="4" tabindex=0></span>
    <span class="fa fa-star-o" id="avg_rating_5" data-stars="5" title="5 stars" role="radio" aria-checked="false" aria-label="5" tabindex=0></span>
</span>
<input type="hidden" name="avg_rating" id="avg_rating_hipt">
#avg_rating_ui{
    margin: 0.25em; /* Add some space around the stars */
    display: inline-block; /* keep the stars together on line breaks */
}
#avg_rating_ui > span{
    cursor: pointer; /* make the mouse turn to a pointer over the stars */
}
// add a change handler to the hidden rating input
$('#avg_rating_hipt').change(function(){
    var $hipt = $(this);

    // read the value form the hidden input
    var starRating = $hipt.val();
    if(starRating < 0 || starRating > 5) starRating = 0;

    // render each star as appropriate
    for(var s = 1; s <= 5; s++){
        var $star = $('#avg_rating_' + s);

        // render the star as full or outline as appropriate
        if(s <= starRating){
            $star.removeClass('fa-star-o').addClass('fa-star');
        }else{
            $star.removeClass('fa-star').addClass('fa-star-o');
        }

        // mark the star as checked for ARIA as appropriate
        if(s == starRating){
            $star.attr('aria-checked', true);
        }else{
            $star.attr('aria-checked', false);
        }
    }
}).change();

// add a click handler to the rating UI
$('span', $('#avg_rating_ui')).click(function(){
    // read the rating from the data attribute
    var starRating = $(this).data('stars');

    // save the rating into the hidden form input and call the change handler
    $('#avg_rating_hipt').val(starRating).change();
});

// add keyboard support to the rating UI
$('span', $('#avg_rating_ui')).keypress(function(e){
    // only respond to the spacebar
    if(e.which === 32){
        $(this).click(); // call the click handler on self
        e.stopPropagation(); // stop the event bubbling
    }
});
To make the form look right I also moved some things around when I added the stars, but I’m not going to focus on that kind of cosmetic change here.
Next, I added a reset button. The HTML markup is straightforward:
<button type="reset" id="reset_btn">Reset</button>
To make the submit button stand out stronger than the reset button I added the following CSS to make the text on the submit button bold:
/* make the submit button bold */
button[type="submit"]{
    font-weight: bold;
}
Finally, I added a reset event handler to ensure all my custom validations and UI behave properly when the form gets reset:
// add a reset event handler
$('#movie_entry_fm').on('reset', function(){
    $('#avg_rating_hipt').val(0).change(); // blank the average rating
    validateGenres(); // reset the custom validation on genre
    $('#cast_ta').change(); // reset the custom validation on cast
    $('#output').val(''); // blank the output area
});
You’ll find my full solution in this instalment’s zip file as pbs41-challenge-solution.html.
Back to Cellular Automata & Conway’s Game of Life
We’ll be using my sample solution from the challenge set way back in instalment 36 as the starting point for our work today. We’ll be updating the core JavaScript prototypes in lib/bartificer.ca.js. We’ll be adding test cases to test/tests.js and viewing the results of our tests via test/index.html. Finally we’ll update sample.html to become an implementation of Conway’s Game of Life. The sample solution is available on GitHub.
As you can probably infer from the list of files we’ll be editing, we’ll be exercising many of the skills we’ve built up throughout this series — JavaScript prototypes, unit testing with QUnit, HTML forms, and jQuery. While we won’t be focusing on it much, all the sample code will also contain JSDoc comments.
A Quick Refresher
It’s been a few months since we last worked on these prototypes. So let’s refresh our memory a little before we dive in.
Firstly — the prototypes we are building model a mathematical construct known as a cellular automaton, or CA. BTW — the correct plural is cellular automata.
A CA consists of a grid of cells, each of which has a current state. That state is just a value, and it can be anything — a number, some text, an abstract concept, anything! Like a CPU, a CA moves forward in time in discrete steps. Each time it steps forward, the state of all each cell is recalculated according to some predefined set of rules. That new state can be based on the preset state of the cell itself and the present state of all eight of the cells that touch it (referred to as neighbouring cells). What differentiates one CA from another is the set of possible states for each cell, and the rule set used to calculate the next state.
Conway’s Game of Life is a specific CA where each cell can be in one of two states, alive, or dead, and where the next state of each cell is determined by the following four rules (wording from Wikipedia):
- Any live cell with fewer than two live neighbours dies, as if caused by underpopulation.
- Any live cell with two or three live neighbours lives on to the next generation.
- Any live cell with more than three live neighbours dies, as if by overpopulation.
- Any dead cell with exactly three live neighbours becomes a live cell, as if by reproduction.
Our aim in this project is to build a collection of prototypes that can be used to add any arbitrary CA into a web page. We’ll test our prototypes by implementing Conway’s game of life.
The prototypes we’re building will be contained within the namespace bartificer.ca. There will be two of them. The CAs generated with these prototypes will be rendered on web pages as tables — a single table representing the CA as a whole, and a table cell for each cell within the CA.
The bartificer.ca.Cell Prototype
This prototype models a single cell within a CA.
In terms of data attributes it stores a current state and a next state, its x and y coordinates within the automaton as a whole, and a jQuery object representing the cell’s <td> element within the <table>.
In terms of functions this prototype provides the usual panoply of accessor methods, and a method to move the state from the current state to the next.
The bartificer.ca.Automaton Prototype
This prototype models the CA as a whole.
In terms of data attributes it contains a grid of cells as a 2D array of bartificer.ca.Cell objects, a reference to the function to use to calculate the next state of each cell (the step function), and a reference to a function for styling a given cell so it visually represents its current state (the render function).
Add a Function to Set the Automaton State
As things stand the bartificer.ca.Cell prototype is pretty much complete.
The bartificer.ca.Automaton prototype is where we’ll be focusing our work in this instalment. As things stand the prototype can successfully store all the needed data, but it’s missing the functions to initialise the state of each cell, and to move the automaton forward one step at a time.
Let’s start by writing a function to set the state of each cell in the CA to some initial value. We’ll name this new function .setState().
This function will need one argument, the new state information. It will need to pass the same validation as the optional sixth argument already supported by the constructor. Rather than duplicating the constructor code in both functions, we should refactor the validation code into a private helper function that can then be called from both the constructor and the new .setState() function. In fact, I’m going to implement this as two functions, one that throws errors with detailed error messages, and one which simply returns true or false:
/**
 * Validate that a given value is a valid state for an automaton as a
 * whole.
 *
 * @memberof bartificer.ca
 * @inner
 * @private
 * @param {*} s - The value to test.
 * @param {GridDimension} rows - The number of rows in the automaton.
 * @param {GridDimension} cols - The number of columns in the automaton.
 * @returns {boolean} Always returns true.
 * @throws {TypeError} Throws a type error if the value is not valid.
 */
function validateAutomatonState(s, rows, cols){
    // check if we have a valid value
    var isValid = false;
    if(isCellState(s)){
        isValid = true;
    }else if($.isArray(s)){
        // make sure each element is a cell state, and that the dimensions match
        if(s.length != cols){
            throw new TypeError('state array has invalid dimensions');
        }
        for(x = 0; x < cols; x++){
            if(s[x].length != rows){
                throw new TypeError('state array has invalid dimensions');
            }
            for(y = 0; y < rows; y++){
                if(!isCellState(s[x][y])){
                    throw new TypeError('state array contains invalid value');
                }
            }
            }

        // if we made it here without throwing an error, the state is valid
        isValid = true;
    }else if(typeof s === 'function'){
        isValid = true;
    }

    // throw an eror if we got here and don't have a valid value
    if(!isValid){
        throw new TypeError('must be a valid cell state (boolean, number, or string), an array of valid cell states with the same dimensions as the automaton, or a callback');
    }
};

/**
 * Test if a given value is a valid state for an automaton as a whole, i.e.
 * a single cell state, an array of cell states with the correct
 * dimensions, or, a callback.
 *
 * @memberof bartificer.ca
 * @inner
 * @private
 * @param {*} s - The value to test.
 * @param {GridDimension} rows - The number of rows in the automaton.
 * @param {GridDimension} cols - The number of columns in the automaton.
 * @return {boolean} `true` if the value is a valid automaton state,
 * `false` otherwise.
 * @see {@link AutomatonState}
 */
function isAutomatonState(s, rows, cols){
    try{
        validateAutomatonState(s, rows, cols);
    }catch(err){
        return false;
    }
    return true;
};
With these new functions written we can alter the validation check in the constructor so it simply becomes:
if(typeof s !== 'undefined' && !isAutomatonState(s, rows, cols)){
    throw new TypeError('if present, the sixth argument must be a valid cell state (boolean, number, or string), an array of valid cell states with the same dimensions as the automaton, or, a callback');
}
In theory, these changes to the code’s structure should have had no effect on the code’s functionality. That’s literally what it means to refactor code. Before we proceed we should validate that we haven’t introduced any bugs during our refactoring by rerunning the QUnit test suite (test/index.html).
We’re now ready to write our function for setting the state of a CA.
We’ll add support for specifying the state in one of three formats:
- A single state as a number, string, or boolean. This single state should be applied to each cell.
- A 2D array of states, i.e., a 2D array of numbers, strings, or booleans. This grid must have exactly the same dimensions as the CA itself. Each cell in the CA will have its state updated to match the value of the corresponding array element.
- A callback that takes the x and y coordinates of the cell as arguments, and returns a valid state, i.e. a boolean, number, or string. This function will be called once for each cell to determine its new state.
We now know everything needed to implement the function:
/**
 * Set the current state of the automaton as a whole.
 *
 * @param {(CellState|CellState[]|initialisationFunction)} [newState] - a
 * new state for the automaton. The state can be specified in three
 * different ways:
 * 1. a single state - each cell in the automaton will be initialised with
 *    this state.
 * 2. an array of states. The array must have the same dimensions as the
 *    automaton.
 * 3. an intialisation callback. The callback will be used to calculate the
 *    initial state of each cell given its coordinates.
 * @throws {TypeError} An error is thrown if an invalid new state is
 * passed.
 * @returns {bartificer.ca.CellularAutomaton} Returns a reference to self.
 */
bartificer.ca.Automaton.prototype.setState = function(newState){
    // validate the new state
    validateAutomatonState(newState, this.rows(), this.cols());

    // set the next state for every cell
    for(var x = 0; x < this.cols(); x++){
        for(var y = 0; y < this.rows(); y++){
            // set the next state of the cell as appropriate
            if(isCellState(newState)){
                // we were passed a single state, so apply it to every cell
                this.cell(x, y).nextState(newState);
            }else if($.isArray(newState)){
                // we were passed an array of states, so use the matching index
                this.cell(x, y).nextState(newState[x][y]);
            }else if(typeof newState === 'function'){
                // we were passed a callback, so invoke it
                this.cell(x, y).nextState(newState(x, y));
            }else{
                // should be impossible!
                throw new TypeError('invalid state');
            }

            // advance the cell to its new state
            this.cell(x, y).advance();

            // render the new state
            this._renderFn(this.cell(x, y).$td(), this.cell(x, y).state());
        }
    }

    // return a reference to self
    return this;
};
Before we can test our new function using the JavaScript console on sample.html we need to tweak the sample CA defined in that file so it renders a state of true as green and false as red. We can do that by changing line 25 from:
function($td){ $td.css('background-color', 'Green') }, // always render as green
To:
function($td, s){ $td.css('background-color', s ? 'Green' : 'Red'); },
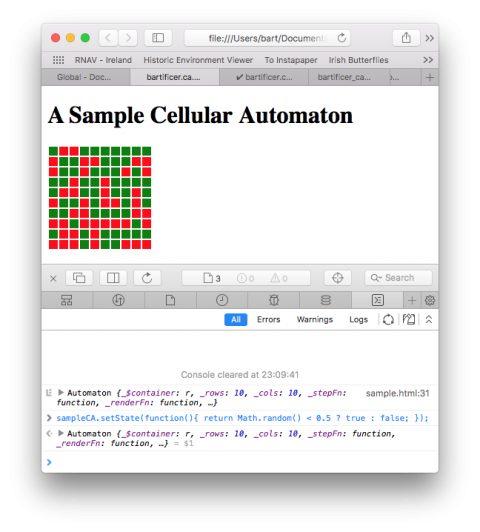
With that change made we can enter the following in the console on sample.html to set each cell in our CA to a state of true or false at random.:
sampleCA.setState(function(){ return Math.random() < 0.5 ? true : false; });
As you can see, this sets our automaton to a random state:
We should now update our constructor so it calls this function when passed an optional sixth argument. We just need to add the following to the end of the constructor:
// initialise the state if the optional sixth argument was passed
if(typeof s !== 'undefined'){
    this.setState(s);
}
Finally, we need to add tests for this new functionality to our QUnit test suite. We should add tests to check that both the constructor and the .setState() function both correctly set the state of a CA.
Let’s start by adding tests to verify that the constructor successfully initialises all cells to a given state when passed a state as an optional sixth argument. I did this by adding the following code to the bottom of the ‘bartificer.ca.Automaton prototype > constructor: argument processing’ test:
// make sure the optional initial state is properly applied
var allCellsOK = true;
var x, y;
for(x = 0; x < c && allCellsOK; x++){
    for(y = 0; y < r; y++){
        if(ca1.cell(x, y).state() !== s) allCellsOK = false;
    }
}
a.ok(allCellsOK, 'single initial state correctly applied to all cells');
var initStates = [
    [1, 2, 3],
    [4, 5, 6],
    [7, 8, 8]
];
var ca2 = new bartificer.ca.Automaton($('<div></div>'), 3, 3, sFn, rFn, initStates);
allCellsOK = true;
for(x = 0; x < 3 && allCellsOK; x++){
    for(y = 0; y < 3; y++){
        if(ca2.cell(x, y).state() !== initStates[x][y]) allCellsOK = false;
    }
}
a.ok(allCellsOK, '2D array of initial states correctly applied to all cells');
var ca3 = new bartificer.ca.Automaton($('<div></div>'), 3, 3, sFn, rFn, function(x, y){
    return x + ', ' + y;
});
allCellsOK = true;
for(x = 0; x < 3 && allCellsOK; x++){
    for(y = 0; y < 3; y++){
        if(ca3.cell(x, y).state() !== x + ', ' + y) allCellsOK = false;
    }
}
a.ok(allCellsOK, 'Initialisation function correctly applied to all cells');
Next I added a separate test for the .setState() function:
QUnit.test('.setState()', function(a){
    a.expect(3);
    var $div = $('<div></div>');
    var r = 3;
    var c = 3;
    var sFn = function(){ return true; };
    var rFn = function(){};
    var allCellsOK = true;
    var x, y;
    var ca = new bartificer.ca.Automaton($div, r, c, sFn, rFn, true);

    // test when given a single state
    ca.setState('boogers');
    for(x = 0; x < c && allCellsOK; x++){
        for(y = 0; y < r; y++){
            if(ca.cell(x, y).state() !== 'boogers') allCellsOK = false;
        }
    }
    a.ok(allCellsOK, 'single initial state correctly applied to all cells');

    // test when given a grid of states
    var initStates = [
        [1, 2, 3],
        [4, 5, 6],
        [7, 8, 8]
    ];
    ca.setState(initStates);
    allCellsOK = true;
    for(x = 0; x < c && allCellsOK; x++){
        for(y = 0; y < r; y++){
            if(ca.cell(x, y).state() !== initStates[x][y]) allCellsOK = false;
        }
    }
    a.ok(allCellsOK, '2D array of initial states correctly applied to all cells');

    // test when given a callback
    ca.setState(function(x, y){
        return x + ', ' + y;
    });
    allCellsOK = true;
    for(x = 0; x < 3 && allCellsOK; x++){
        for(y = 0; y < 3; y++){
            if(ca.cell(x, y).state() !== x + ', ' + y) allCellsOK = false;
        }
    }
    a.ok(allCellsOK, 'Initialisation function correctly applied to all cells');
});
Now that we know this much of the code is working, we should update our sample page so it initialises the CA to a random state automatically. We do this by updating the initialisation code in sample.html to:
// a globally scoped variable to hold the automaton object
var sampleCA;

// a render function to render live cells green and dead cells red
function renderRedGreen($td, s){
    // render a true state as green, and false as red
    if(s == true){
        $td.css('background-color', 'Green');
    }else{
        $td.css('background-color', 'Red');
    }
}

// an initialisation function to randomly set each cell to true or false
function randomBoolean(){
    return Math.random() < 0.5 ? true : false;
}

// add a document ready event handler
$(function(){
    // use the constructor to build an automaton
    sampleCA = new bartificer.ca.Automaton(
        $('main'), // use the main tag as the container
        10, 10, // make it a 10x10 grid
        function(){ return true; }, // always set the state to true
        renderRedGreen, // pass our red/green render function
        randomBoolean // initialise each cell to a random boolean
    );

    // log the generated automaton object so we can have a look inside
    // it look at it with the JavaScript console if we want
    console.log(sampleCA);
});
Add a Step Function
Now that we can set an initial state on our CAs, the next thing we need is the ability to tick the CA forward by one step, updating the state of all the cells using the step function.
We’ll do that by adding a function named .step() to the bartificer.ca.Automaton prototype. This function will do the following:
- Loop through the entire grid and set the next state of each cell
- Loop through the entire grid and advance and rerender each cell
In order to calculate the next state of any given cell, we need to call the step function with the current state of the cell and the current state of all it’s neighbouring cells. This means that, before we can write .step(), we need to write a function for returning the current state of all the neighbours of a given cell. We’ll name this function .cellNeighbourStates(), and have it return an array of eight cell states where the state in position zero is the one from the cell directly above the current cell, and then clockwise from there.
/**
 * Get the states of a cell's neighbouring cells.
 *
 * @param {GridCoordinate} x - the x coordinate of the requested cell.
 * @param {GridCoordinate} y - the y coordinate of the requested cell.
 * @returns {CellState[]} Returns an array of eight cell states where the
 * state at index zero is that from the cell directly above the current
 * cell, and then moving clockwise from there. If a cell is at an edge,
 * the indexes for the non-existent positions will still be included in the
 * array, but they will have the value `null`.
 * @throws {TypeError} A type error is thrown if invalid arguments are
 * passed.
 * @throws {RangeError} A range error is thrown if the coordinates specify
 * a cell beyond the edges of the automaton.
 */
bartificer.ca.Automaton.prototype.cellNeighbourStates = function(x, y){
    // validate the coordinates by getting a reference to the cell
    this.cell(x, y);

    // initialise the array
    var ans = [];

    // calculate each neighbour state one by one
    ans[0] = y >= 1 ? this.cellState(x, y - 1) : null; // 12 oclock
    ans[1] = x + 1 < this.cols() && y >= 1 ? this.cellState(x + 1, y - 1) : null;
    ans[2] = x + 1 < this.cols() ? this.cellState(x + 1, y) : null; // 3 oclock
    ans[3] = x + 1 < this.cols() && y + 1 < this.rows() ? this.cellState(x + 1, y + 1) : null;
    ans[4] = y + 1 < this.rows() ? this.cellState(x, y + 1) : null; // 6 oclock
    ans[5] = x >= 1 && y + 1 < this.rows() ? this.cellState(x - 1, y + 1) : null;
    ans[6] = x >= 1 ? this.cellState(x - 1, y) : null; // 9 oclock
    ans[7] = x >= 1 && y >= 1 ? this.cellState(x - 1, y - 1) : null;

    // return the array
    return ans;
};
I think you’ll agree there is a lot of room for error in the body of this function — let’s write and run a QUnit test to make sure we got it right before we go any further!
QUnit.test('.cellNeighbourStates()', function(a){
    a.expect(6);

    // make sure the accessor exists
    a.strictEqual(typeof this.ca1.cellNeighbourStates, 'function', 'function exists');

    // build a CA to test against
    var stateArray = [
        [1,  6, 11, 16],
        [2,  7, 12, 17],
        [3,  8, 13, 18],
        [4,  9, 14, 19],
        [5, 10, 15, 20]
    ];
    // above represents grid:
    //  1  2  3  4  5
    //  6  7  8  9 10
    // 11 12 13 14 15
    // 16 17 18 19 20
    var ca = new bartificer.ca.Automaton($('<div></div>'), 4, 5, this.sFn, this.rFn, stateArray);

    // check an internal cell
    a.deepEqual(ca.cellNeighbourStates(3, 2), [9, 10, 15, 20, 19, 18, 13, 8], 'internal cell OK');

    // check the four corners
    a.deepEqual(ca.cellNeighbourStates(0, 0), [null, null, 2, 7, 6, null, null, null], 'top-left corner OK');
    a.deepEqual(ca.cellNeighbourStates(4, 0), [null, null, null, null, 10, 9, 4, null], 'top-right corner OK');
    a.deepEqual(ca.cellNeighbourStates(4, 3), [15, null, null, null, null, null, 19, 14], 'bottom-right corner OK');
    a.deepEqual(ca.cellNeighbourStates(0, 3), [11, 12, 17, null, null, null, null, null], 'bottom-left corner OK');
});
Now that we know .cellNeighbourStates() works correctly, we’re ready to write .step():
/**
 * Step the automaton forward by one step.
 *
 * @returns {bartificer.ca.CellylarAutomaton} Returns a reference to self.
 */
bartificer.ca.Automaton.prototype.step = function(){
    // first calculate the next state of each cell
    var x, y;
    for(x = 0; x < this.cols(); x++){
        for(y = 0; y < this.rows(); y++){
            // get a reference to the current cell
            var c = this.cell(x, y);

            // calculate the nexty state
            var ns = this._stepFn(c.state(), this.cellNeighbourStates(x, y));

            // set the cell's next state to the newly calculated value
            c.nextState(ns);
        }
    }

    // finally move each cell forward into its next state and re-render it
    for(x = 0; x < this.cols(); x++){
        for(y = 0; y < this.rows(); y++){
            this.cell(x, y).advance();
            this._renderFn(this.cell(x, y).$td(), this.cell(x, y).state());
        }
    }

    // return a reference to self
    return this;
};
Before we go any further, let’s create a QUnit test for our new function:
QUnit.test('.step()', function(a){
    a.expect(1);

    // create a CA with a step function that increments the state by 1
    var stateArrayPre = [
        [1,  6, 11, 16, 21],
        [2,  7, 12, 17, 22],
        [3,  8, 13, 18, 23],
        [4,  9, 14, 19, 24],
        [5, 10, 15, 20, 25]
    ];
    var stateArrayPost = [
        [2,  7, 12, 17, 22],
        [3,  8, 13, 18, 23],
        [4,  9, 14, 19, 24],
        [5, 10, 15, 20, 25],
        [6, 11, 16, 21, 26]
    ];
    var ca = new bartificer.ca.Automaton($('<div></div>'), 5, 5, function(s){ return s + 1; }, function(){ }, stateArrayPre);

    // step the CA
    ca.step();

    // make sure each state was incremented by 1
    var allOK = true;
    for(var x = 0; x < 5; x++){
        for(var y = 0; y < 5; y++){
            if(ca.cellState(x, y) !== stateArrayPost[x][y]) allOK = false;
        }
    }
    a.ok(allOK, 'all cells were stepped correctly');
});
To test our step function visually, let’s update sample.html to go from using an anonymous function that always sets the next state to true to one that inverts the state of each cell. We can do this by changing the anonymous function passed to the bartificer.ca.Automaton constructor from:
function(){ return true; }, // always set the state to true
To:
function(cs){ return cs ? false : true; }, // always invert the state
If we now reload sample.html in our browser, we can see .step() in action by entering the following in the JavaScript console:
sampleCA.step();
This should cause every cell to invert – all the red cells should go green, and vice-versa.
Implementing the Game of Life
We’re now ready to create a step function that implements the rules of the game of life (see above).
// a step function that implements Conway's game of life
function lifeStep(currentState, neighbourStates){
    // calcualte the number of live neighbours
    var numLiveNeighbours = 0;
    neighbourStates.forEach(function(s){
        if(s == true) numLiveNeighbours++;
    });

    // apply the rules based on the current state
    if(currentState == true){
        // currently alive - apply rules 1 to 3

        // rule 1
        if(numLiveNeighbours < 2) return false;

        // rule 3
        if(numLiveNeighbours > 3) return false;
    }else{
        // currently dead - apply rule 4
        if(numLiveNeighbours === 3) return true;
    }

    // default to no change (incorporates rule 2)
    return currentState;
}
With that function written, we can again update our call to the bartificer.ca.Automaton constructor so it uses this step function. The Game of Life needs a little more room to really work. Let’s also update our call to the constructor to build a CA with more rows and columns:
// use the constructor to build an automaton
sampleCA = new bartificer.ca.Automaton(
    $('#game_of_life_container'), // use the div as the container
    50, 100, // make it a 100x50 grid
    lifeStep, // pass the game of life step function
    renderRedGreen, // pass our red/green render function
    randomBoolean // initialise each cell to a random boolean
);
We can now advance the game of life one step at a time by repeatedly entering the following into the JavaScript console on sample.html:
sampleCA.step();
Adding a Step Button
Now that we can advance the game of life one step at a time using the JavaScript console, we’re ready to add a button to the page to expose that functionality to users.
First, we’ll need some HTML markup for the button. At the moment the entire <main> element is used as the container for the CA. We should move the CA into a <div> within <main> so we can also add the button into <main>. This gives us the following new markup for the main section of the page:
<main>
    <form action="javascript:void(0);">
    <p><button type="button" id="step1_btn">Step Forward 1x</button></p>
    </form>
    <div id="game_of_life_container"></div>
    <p>For more information on Conway's Game of Life <a href="https://en.wikipedia.org/wiki/Conway%27s_Game_of_Life" target="_blank" rel="noopener">see this Wikipedia article</a>.</p>
</main>
Note that this change in markup means we need to change the jQuery object we pass into the bartificer.ca.Automaton constructor from $('main') to $('#game_of_life_container').
With the markup added, we now need to add a click handler inside the document ready handler:
// add a click handler to the step button
$('#step1_btn').click(function(){
    sampleCA.step();
});
Now that our sample page implements Conway’s Game of Life, it makes sense to tweak the text a little. With all that done, the full source for the final sample page is included below:
<!DOCTYPE HTML>
<html>
<head>
    <meta charset="utf-8" />
    <title>bartificer.ca.Automaton Demo - Conway's Game of Life</title>

    <!-- Load jQuery 3 from the official CDN -->
    <script type="text/javascript" src="https://code.jquery.com/jquery-3.2.1.min.js" integrity="sha256-hwg4gsxgFZhOsEEamdOYGBf13FyQuiTwlAQgxVSNgt4=" crossorigin="anonymous"></script>

    <!-- load the bartificer.ca API from GitHub -->
    <script type="text/javascript" src="https://cdn.rawgit.com/bbusschots/bartificer_ca_js/PBS42-Challenge-StartingPoint/lib/bartificer.ca.js"></script>

    <!-- Add the JavaScript code to initialise a Cellular Automaton -->
    <script type="text/javascript">
        // a globally scoped variable to hold the automaton object
        var sampleCA;

        // a render function to render live cells green and dead cells red
        function renderRedGreen($td, s){
            // render a true state as green, and false as red
            if(s == true){
                $td.css('background-color', 'Green');
            }else{
                $td.css('background-color', 'Red');
            }
        }

        // an initialisation function to randomly set each cell to true or false
        function randomBoolean(){
            return Math.random() < 0.5 ? true : false;
        }

        // a step function that implements Conway's game of life
        function lifeStep(currentState, neighbourStates){
            // calcualte the number of live neighbours
            var numLiveNeighbours = 0;
            neighbourStates.forEach(function(s){
                if(s == true) numLiveNeighbours++;
            });

            // apply the rules based on the current state
            if(currentState == true){
                // currently alive - apply rules 1 to 3

                // rule 1
                if(numLiveNeighbours < 2) return false;

                // rule 3
                if(numLiveNeighbours > 3) return false;
            }else{
                // currently dead - apply rule 4
                if(numLiveNeighbours === 3) return true;
            }

            // default to no change (incorporates rule 2)
            return currentState;
        }

        // add a document ready event handler
        $(function(){
            // use the constructor to build an automaton
            sampleCA = new bartificer.ca.Automaton(
                $('#game_of_life_container'), // use the div as the container
                50, 100, // make it a 100x50 grid
                lifeStep, // pass the game of life step function
                renderRedGreen, // pass our red/green render function
                randomBoolean // initialise each cell to a random boolean
            );

            // log the geneated automaton object so we can have a look inside
            // it in the JavaScript console if we want
            console.log(sampleCA);

            // add a click handler to the step button
            $('#step1_btn').click(function(){
                sampleCA.step();
            });
        });
    </script>

    <!-- Stype the Automaton -->
    <style type="text/css">
        /* style the cells in the automaton */
        td.bartificer-ca-cell{
            width: 10px;
            height: 10px;
        }
    </style>
</head>
<body>
<header><h1>A Sample Cellular Automaton - Conway's Game of Life</h1></header>
<main>
    <form action="javascript:void(0);">
    <p><button type="button" id="step1_btn">Step Forward 1x</button></p>
    </form>
    <div id="game_of_life_container"></div>
    <p>For more information on Conway's Game of Life <a href="https://en.wikipedia.org/wiki/Conway%27s_Game_of_Life" target="_blank" rel="noopener">see this Wikipedia article</a>.</p>
</main>
</body>
</html>
You’ll find a stand-alone version of this file in this instalment’s ZIP file as pbs42.html, and you’ll also find a version of it on GitHub as sample.html in the release tagged PBS42-Challenge-StartingPoint.
A Challenge
Using sample.html from the release named PBS42-Challenge-StartingPoint on GitHub as your starting point, expand the UI so it supports the following user actions:
- An automatic mode where the CA ticks forward by itself. It should be possible to stop and start the automatic mode
- A visible counter that shows the current generation count, i.e. the number of times the
.step()function has been called. - For bonus credit, add the ability for users to control the speed of the automatic mode.
Final Thoughts
It’s great to finally get to the point in the series where our three threads — HTML, CSS & JavaScript — have come together into an actual app. We really have created our own zero-player online game!
From a CSS & HTML point of view, the next step in the series will be to learn about responsive web design. We’ll do that using the free and open source Bootstrap 4 library. From a JavaScript point of view the next step will be to upgrade ourselves from JavaScript ES5 to ES6. When we started our explorations of JavaScript, ES 6 existed, but there just wasn’t enough browser support to consider using it. Thankfully that has now changed. It’s time we started to benefit from the improvements ES6 has to offer us.
I was in two minds which to do first, Bootstrap or ES6, but working on this instalment made that decision very easy — we’ll be looking at ES6 in the next instalment. Why? For purely selfish reasons — I’ve been using ES7 in work for the past few months, so being forced to write ES5 code now is just painful! I wish browser support was good enough to go all the way to ES7 in this series, but it’s not, so I’ll have to settle for ES6 for now 🙂