PBS 35 of X: HTML Text Input | Introducing ‘Life’
We’ll start this instalment by rounding out our look at QUnit – first, by taking a quick look at my sample solution to the challenge from the previous instalment, and then by introducing a simple little feature that will make this instalment’s challenge more manageable.
Next, we’ll make a start on text input in HTML forms. This time we’ll focus purely on free-form text. In the next instalment we’ll move on to formatted subsets of text like numbers, email addresses and so on.
Finally, we’ll make a start on what will be an on-going project. The idea is to combine our understanding of HTML, CSS, JavaScript, jQuery, and QUnit to implement a zero-player with a really cool computer science back story.
As usual, I’ve created a ZIP file with the files for this instalment, including a sample HTML page that demonstrates text input in action, and the files that make up the starting point for this instalment’s challenge which you can download here or here on GitHub.
Matching Podcast Episode 487
Listen Along: Chit Chat Across the Pond Episode 487
You can also Download the MP3
Solution to PBS 34 Challenge
At the end of the previous instalment I set the challenge of creating unit tests for the bartificer.linkToolkit.js JavaScript API we built together much earlier in this series, and which I then finessed a little before releasing as an open source project on GitHub. We made a start on the test suite together. The assignment was to continue building tests for more of the functions, starting with the function bartificer.linkToolkit.markExternal(), and continuing from there for as much or as little as you felt would be helpful to your learning.
As a quick reminder, bartificer.linkToolkit.markExternal() is supposed to scan an HTML document, or part of an HTML document, find all the links that have a target of _blank, and inject an icon into the document after the link to mark the fact that the link opens in a new window/tab. Basically, it’s a courtesy to the viewers of the page to make it easier to see which links will navigate the current window/tab to a new location, and which will open up a new window/tab.
A test runner file was provided as part of the starting point for the challenge (test/index.html). It contains a div with the special ID qunit-fixture, which we’ll call the fixture. The fixture contains a bulleted list of links, one per list item. These links contain a nice mixture of different destination URLs, targets, and rel attributes. As we learned in the previous instalment, what makes the fixture special is that QUnit resets it back to how it was when the page loaded after each QUnit test finishes executing. This means that each test gets to work on a pristine version of the fixture. Just to highlight this point again, the reset happens after every test, not after every assertion.
Bearing all this in mind, a QUnit test for a function that alters the DOM should use the following basic approach:
- Call the function on the fixture – if the function works as expected, this should result in the DOM being altered.
- Call one or more assertions. Using jQuery, these assertions should check that DOM has indeed been altered in the expected way.
My approach to testing the bartificer.linkToolkit.markExternal() function is to break the task into a number of separate tests. One test is to validate that the function works as expected when called without specifying any options – that is, with all the options at their default value. Then, I added separate tests for each of the supported options. Each of these tests starts by calling the function on the fixture with the appropriate options specified, followed by the assertions for checking that the function altered the content of the fixture as expected.
Since these assertions rely heavily on jQuery, this is a good opportunity for some jQuery practice/revision.
Since I wrote multiple tests for each function, it made sense to group those tests into a QUnit module. Below is the code for my QUnit module for testing bartificer.linkToolkit.markExternal():
//
// === Tests for bartificer.linkToolkit.markExternal() ========================
//
QUnit.module('markExternal()', {}, function(){
    QUnit.test('function exists', function(a){
        a.strictEqual(typeof bartificer.linkToolkit.markExternal, 'function', 'has type function');
    });

    QUnit.test('default options', function(a){
        var ids_must_have_icon = ['rl_tb_nr', 'al_tb_nr', 'as_tb_nr', 'ab_tb_nr', 'ap_tb_nr', 'ap_tb_rf', 'ap_tb_ro', 'ap_tb_r2', 'ap_tb_nr_in'];
        var ids_no_target = ['rl_nt_nr', 'al_nt_nr', 'as_nt_nr', 'ab_nt_nr', 'ap_nt_nr'];
        a.expect(ids_must_have_icon.length + ids_no_target.length + 5);

        // call the function on the fixture with the default options
        bartificer.linkToolkit.markExternal($('#qunit-fixture'));

        // make sure there was an icon added after each of the links with a target
        // of _blank that does not have one of the relevant ignore classes
        ids_must_have_icon.forEach(function(aId){
            var $a = $('#' + aId); // the link
            var $li = $a.parent(); // the list item containing the link
            a.equal(
                $('a + img', $li).length, // the number of images after links in the list item
                1, // one image should have been added after the link
                'an image was added after the link: ' + $a.text()
            );
        });

        // make sure no icon was added after any of the links with a target of _blank
        ids_no_target.forEach(function(aId){
            var $a = $('#' + aId); // the link
            var $li = $a.parent(); // the list item containing the link
            a.equal(
                $('img', $li).length, // the number of images in the list item
                0, // there should be no images in the list item
                'no image was added after the link: ' + $a.text()
            );
        });

        // make sure the links with the appropriate ignore classes were ignored
        a.equal(
            $('img', $('#ap_tb_nr_ib').parent()).length,
            0,
            'no icon added after link with class "bartificer-ignore"'
        );
        a.equal(
            $('img', $('#ap_tb_nr_im').parent()).length,
            0,
            'no icon added after link with class "bartificer-markExternal-ignore"'
        );

        // make sure the icons have the expected attributes
        var $sampleIcon = $('li a + img', $('#qunit-fixture')).first();
        a.ok(
            $sampleIcon.is('.bartificer-externalLink'),
            'generated icons have the class "bartificer-externalLink"'
        );
        a.equal(
            $sampleIcon.attr('alt'),
            'External Link Icon',
            'generated icons have the expected alt text'
        );
        a.equal(
            $sampleIcon.attr('title'),
            'Link Opens in New Window/Tab',
            'generated icons have the expected title'
        );
    });

    QUnit.test('option iconSrc', function(a){
        // a custom image URL to use for the icons
        var customIconSrc = 'externalIcon.png'; // does not need to exist for the test to work

        // call the function on the fixture with the relevant option set
        bartificer.linkToolkit.markExternal(
            $('#qunit-fixture'),
            { iconSrc: customIconSrc }
        );

        // make sure the icons have the custom source URL
        a.equal(
            $('li a + img', $('#qunit-fixture')).first().attr('src'),
            customIconSrc,
            'generated icons have the expected custom source URL'
        );
    });

    QUnit.test('option iconExternal=false', function(a){
        a.expect(2);

        // call the function on the fixture with the relevant option set
        bartificer.linkToolkit.markExternal(
            $('#qunit-fixture'),
            { iconExternal: false }
        );

        // make sure an icon was added inside a sample link
        a.equal(
            $('img', $('#rl_tb_nr')).length, // the number of images inside the link
            1, // there should be exactly one image in the link
            'icon added inside the link'
        );

        // make sure no icon was added after the link
        a.equal(
            $('a + img', $('#rl_tb_nr').parent()).length, // the number of images after links in the list item
            0, // there should be no images after the link
            'no icon added after the link'
        );
    });

    QUnit.test('option iconClasses', function(a){
        // the classes to add
        var extraIconClasses = ['testc1', 'testc2', 'testc3'];

        a.expect(extraIconClasses.length + 1);

        // call the function on the fixture with the relevant option set
        bartificer.linkToolkit.markExternal(
            $('#qunit-fixture'),
            { iconClasses: extraIconClasses.join(' ') }
        );

        // make sure each of the classes was added
        var $sampleIcon = $('li a + img', $('#qunit-fixture')).first();
        extraIconClasses.forEach(function(c){
            a.ok(
                $sampleIcon.is('.' + c),
                'Genereated icons have the additonal class: ' + c
            );
        });

        // make sure the default class was also added
        a.ok(
            $sampleIcon.is('.bartificer-externalLink'),
            'standard class added as well as extra classes'
        );
    });

    QUnit.test('option altText', function(a){
        var customAltText = 'dummy alt text';

        // call the function on the fixture with the relevant option set
        bartificer.linkToolkit.markExternal(
            $('#qunit-fixture'),
            { altText: customAltText }
        );

        // make sure the icons have the custom alt text
        a.equal(
            $('li a + img', $('#qunit-fixture')).first().attr('alt'),
            customAltText,
            'generated icons have the expected alt text'
        );
    });

    QUnit.test('option titleText', function(a){
        var customTitleText = 'dummy title text';

        // call the function on the fixture with the relevant option set
        bartificer.linkToolkit.markExternal(
            $('#qunit-fixture'),
            { titleText: customTitleText }
        );

        // make sure the icons have the custom title
        a.equal(
            $('li a + img', $('#qunit-fixture')).first().attr('title'),
            customTitleText,
            'generated icons have the expected title text'
        );
    });
});
As usual, I want to draw your attention to a few aspects of my solution.
In the first test, it was important to check each link, one by one, to see whether or not an image was added after that link as appropriate. Some links should not have gotten an image added, while some should. To avoid code duplication, I created two arrays of strings, one with the IDs of the links that should have had an icon added, and one with those that shouldn’t. Then it’s a matter of looping over both arrays and making the appropriate check.
Because the fixture was structured to have each link in its own list item, testing for the addition (or not) of images can be boiled down to counting the number of img tags within the li tag that contains the link (a tag) being tested. For links that should have an icon added, we expect to find one image within the containing list item, and for links that shouldn’t have an icon added, we expect to find no images within the containing list item. So, given the ID of the link, how do we find the number of images?
This all comes down to remembering our jQuery from earlier in the series. Firstly, to get a jQuery object representing a link given its ID, we call the $ function with the ID prefixed with a # symbol as the only argument, so within my loops that’s simply:
var $a = $('#' + aId); // the link
Once we have the link, we can get a jQuery object that represents the containing list item by simply calling .parent() on the jQuery object representing the link. In my loops, that’s simply:
var $li = $a.parent(); // the list item containing the link
Now that we have an object representing the appropriate list item, we need to create a jQuery object that represents all the images within that list item that come directly after a link. We do this by using the two-argument form of the $ function – the first argument will be the selector specifying what to search for, and the second argument will be a jQuery object describing the subset of the document in which to confine the search.
The second argument is the easy one – we want to confine our search within the list item, so simply $li.
The selector is a little more complicated, but not much. The documentation says that images should be added after the link, so the relevant CSS selector is the one for after, which is the + symbol. To select images after links, the css selector is a + img.
Finally, the length property of a jQuery object tells you how many elements it represents. Putting it all together we get the following line in each of my loops:
$('a + img', $li).length, // the number of images after links in the list item
When it comes to testing the options, it’s generally not so much about testing which links did or did not get an image added, but picking a single link that should be marked as external and making sure it was altered in the appropriate way. A good example of this is the test to make sure the altText option does indeed set the appropriate alt text on the added images:
QUnit.test('option altText', function(a){
    var customAltText = 'dummy alt text';

    // call the function on the fixture with the relevant option set
    bartificer.linkToolkit.markExternal(
        $('#qunit-fixture'),
        { altText: customAltText }
    );

    // make sure the icons have the custom alt text
    a.equal(
        $('li a + img', $('#qunit-fixture')).first().attr('alt'),
        customAltText,
        'generated icons have the expected alt text'
    );
});
Rather than seeking out an exact ID to use as a sample, I simply chose to examine the first added image, again making use of jQuery. My approach was to first get all images directly after links within list items within the fixture. We’ve already see that the selector for images after links is a + img. To get images after links within list items we need to combine that with the selector for containment, which is simply a space. So, the selector for all images directly after links within a list item is li a + img.
We can use this selector with the two-argument version of the $ function to confine the search to the fixture as follows:
$('li a + img', $('#qunit-fixture'))
This results in a jQuery object representing many images. To pick a single one to test, I simply used jQuery’s .first() function to get just the first one. Finally, what I actually need to test is the alt attribute, so I need to call the .attr() function with a single argument, the name of the attribute I want. So, the expected argument for the assertion becomes:
$('li a + img', $('#qunit-fixture')).first().attr('alt')
Note that the containment and after selectors are also central to the test for the iconExternal option. This option is true by default, meaning images should be added directly after links by default. However, if this option is set to false, the image should be added as the last thing inside the link:
QUnit.test('option iconExternal=false', function(a){
    a.expect(2);

    // call the function on the fixture with the relevant option set
    bartificer.linkToolkit.markExternal(
        $('#qunit-fixture'),
        { iconExternal: false }
    );

    // make sure an icon was added inside a sample link
    a.equal(
        $('img', $('#rl_tb_nr')).length, // the number of images inside the link
        1, // there should be exactly one image in the link
        'icon added inside the link'
    );

    // make sure no icon was added after the link
    a.equal(
        $('a + img', $('#rl_tb_nr').parent()).length, // the number of images after links in the list item
        0, // there should be no images after the link
        'no icon added after the link'
    );
});
I actually wrote tests for all the functions that make up the bartificer.linkToolkit.js API, and added them into the project’s GitHub repository. In the process of writing the tests for the function bartificer.linkToolkit.autoExternalise() I actually discovered two bugs with how the function processes options, which I promptly fixed. This yet again illustrates the value of writing a test suite.
Having added the test suite, and fixed the bugs, I decided to publish a new release of the API, which I tagged as version 1.0. You can download the release on GitHub, or you can view my completed test suite online.
QUnit’s todo Feature
Before we move away from JavaScript I briefly want to mention another useful feature in the QUnit testing framework. You can write tests for code that you’re not working on yet by using the function todo instead of test. It really is as simple as replacing QUnit.test with QUnit.todo. This will keep the test disabled until you’re ready for it. When you want to enable the test, just change QUnit.todo back to QUnit.test.
Tests marked as todo are not run, but they also don’t vanish from the test runner’s output, as shown by the following screenshot (a sneak peak at this instalment’s challenge starting point):
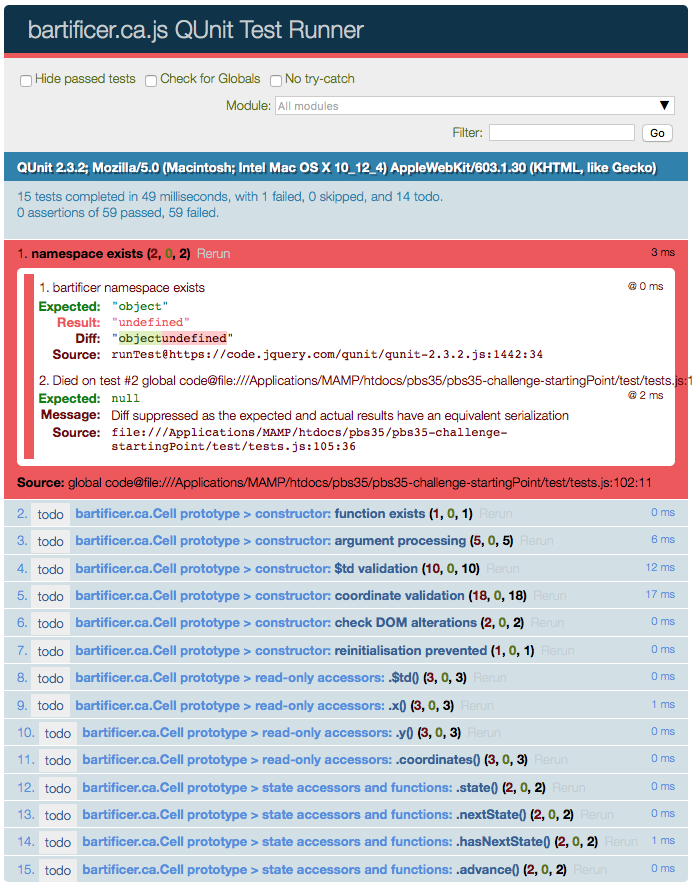 Click to See Full Size
Basic Text Input in HTML
Now let’s switch back to HTML forms. As a quick reminder, so far we’ve learned about the form tag for defining a form, the fieldset and legend tags for grouping form inputs into logical groupings, and using the input tag to create both checkboxes and radio buttons. We’ve also learned that all form inputs are designed to evaluate to name-value pairs for sending to a web server for processing.
HTML5 has much more advanced text input support than earlier versions of HTML. While we will look at type-specific text input (passwords, URLs, email addresses, numbers, etc.) soon, we’re going to confine ourselves to purely generic text input in this instalment.
Regardless of the type of text you want to accept from the user, there is one universal distinction you cannot ignore – in HTML, single-line text input and multi-line text input are seen as totally different things, and are accomplished using completely different tags. For simplicity we’ll refer to single-line text inputs as text boxes (you may see them referred to as text fields elsewhere), and multi-line text inputs as text areas.
Regardless of which kind of text input you’re using, you should always label your text inputs with the label tag. As we learned previously, the label tag can work in two ways:
- You can wrap both the input being labeled and the label text inside a single
labeltag - You can have only the label text inside the label tag, and then associate the label with the tag by setting the
forattribute on the label to the ID of the input being labeled.
Again, regardless of the type of text input you are using, the name part of the input’s name-value pair is specified using the name attribute.
Text Boxes
Text boxes are created using the input tag with the type attribute set to text. As with all other inputs, the label tag should be use to label text boxes. And as we have seen before, the label tag can be used in two ways: either this tag can contain both the label text and the input tag, or the label and input tags can be separate from each other and the label can be associated with the text box by setting the for attribute on the label tag to the text box’s ID.
Below is a very simple form with just a single text box:
<form action="javascript:void(0);">
<label>Your Name <input type="text" name="user_name" /></label>
</form>
And it looks like this:

The value attribute can be used to specify text that will be preloaded into the text box when the page loads or the form is reset:
<form action="javascript:void(0);">
<label>Your Name <input type="text" name="user_name" value="John Doe" /></label>
</form>
The form now looks like this when the page loads:

HTML 5 added the placeholder attribute for specifying placeholder text that’s visible but dimmed while the text box is empty and not focused, and invisible the rest of the time. Here we can see a placeholder used to give the user a hint as to what to enter:
<form action="javascript:void(0);">
<label>Your Name <input type="text" name="user_name" placeholder="e.g. John Doe" /></label>
</form>

The visual size of the text box depends on the font size. The bigger the font size the taller the text box. The length of the text box is controlled by the size attribute, and specified as a number of characters, not a pixel size or percentage.
The number of characters that can be typed before the browser will prevent further entry is controlled by the maxlength attribute. If you set a size of 10 and a maxlength of 3, the text box will be rendered large enough for 10 characters, but the browser will prevent the user from ever typing more than 3 characters. If you do it the other way around, the text box will be small, but will accept up to 10 characters of input, scrolling as needed. In general, you usually want a little more space than the maximum length, so you might set a maxlength of 2 and a size of 3:
<form action="javascript:void(0);">
<label>Your 2-Letter Country Code <input type="text" name="user_country" placeholder="US" maxlength="2" size="3" /></label>
</form>

HTML 5 has added two very important attributes for controlling how modern browsers deal with text in text boxes. The spellcheck attribute tells browsers with spell checking support how they should treat the text box, and the autocomplete attribute tells browsers that support autocompletion what they should do with the text in a given text box.
Of the two, the spellcheck attribute is the simplest – it has just two valid values, true to enable spell checking, and false to disable it.
The autocomplete attribute on the other hand is a little more complex. It does have basic on-off functionality, but it can also do more than that on some browsers. Setting autocomplete to off disables autocompletion within the text box completely. Setting it to on enables it. You can also give the autocomplete feature a hint as to how it can be more helpful by setting autocomplete to other special values like tel to indicate you expect a telephone number, or url to indicate you expect an website address, and so on. The full list of possible values is defined in the WHATWG Standard.
Text Areas
The HTML tag to create a text area is textarea. Unlike the input tag, the textarea tag must always be closed.
Unlike text boxes, text areas don’t have a value attribute. Instead, initial text is entered between the opening and closing textarea tags.
Like text boxes, the placeholder attribute allows dimmed help text to be added when the text area is empty and not focused.
Again, like text boxes, you can use the spellcheck attribute with the values true or false to enable or disable spell checking within the text area. You can also enable or disable autocompletion with the autocomplete attribute, but, unlike text boxes, text areas only support on and off, not the other more advanced values like tel or url.
Like text boxes, the visual size of text areas is determined by the font size. The dimensions are specified in characters rather than pixels or percentages. Since there are two dimensions, there are two attributes – the width of the text area in characters is specified with the rows attribute, and the height with the cols attribute.
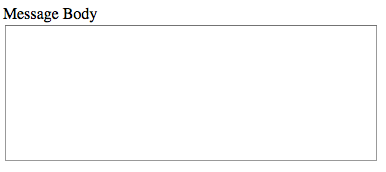
<form action="javascript:void(0);">
<label for="message_body">Message Body</label><br />
<textarea id="message_body" name="body" rows="10" cols="50"></textarea>
</form>
There’s one final text area attribute that I want to draw your attention to – wrap. This attribute controls how the text area should behave when the cursor reaches the right edge of the text box and you keep typing. There are three valid values for this attribute.
The default value for the wrap attribute is soft. This causes text areas to behave similarly to a word processor. The lines are displayed as wrapping, but there are no actual newline characters inserted into the contents of the text area. Setting wrap to hard makes the browser actually insert newline characters when text reaches the right edge of the text area. Finally, setting wrap to off causes the text area to become horizontally scrollable if a line of text has more characters than there are columns.
Text Inputs and jQuery
When it comes to interacting with text boxes and text areas with jQuery, things are actually very straightforward. The contents can be accessed with jQuery’s .val() function – with no arguments to get the current contents, and with a string as the first argument to set the contents to a new value.
The various attributes like name and placeholder can be accessed using jQuery’s .attr() function. As a quick reminder, .attr() expects the name of the attribute as the first argument. If there’s no second argument it’ll return the current value. If there is, it’ll set the value to that of the second argument.
Text Input Example
Let’s put it all together with a simple example form that uses one of each kind of text input. You’ll find the code below in the zip file for this instalment as pbs35.html:
<!DOCTYPE HTML>
<html>
<head>
    <meta charset="utf-8" />
    <title>PBS 35 - Text Input Example</title>

    <!-- Load jQuery from their CDN -->
    <script type="text/javascript" src="https://code.jquery.com/jquery-3.1.1.min.js" integrity="sha256-hVVnYaiADRTO2PzUGmuLJr8BLUSjGIZsDYGmIJLv2b8=" crossorigin="anonymous"></script>

    <!-- Add an event handler for the button -->
    <script type="text/javascript">
        $(function(){
            $('#msg_send').click(function(){
                var subject = $('#msg_subject').val() || $('#msg_subject').attr('placeholder');
                var msg = subject + ':\n---\n\n' + $('#msg_body').val();
                window.alert(msg);
            });
        });
    </script>
</head>
<body>
<h1>PBS 35 - Text Input Example</h1>
<form action="javascript:void(0);">
<fieldset>
    <legend>Generic Message Thingy</legend>
    <ul>
        <li>
            <label>
                Subject
                <input type="text" name="subject" id="msg_subject" spellcheck="false" autocomplete="off" size="50" placeholder="-No Subject-" />
            </label>
        </li>
        <li>
            <label for="msg_body">Message Body</label><br />
            <textarea id="msg_body" name="body" rows="10" cols="55"></textarea>
        </li>
    </ul>
    <p><button type="button" id="msg_send">Send</button></p>
</fieldset>
</form>
</body>
</html>
Notice I have disabled autocompletion and spell checking on the subject text box, but not the text area.
A New JavaScript Project – Building a Cellular Automaton Prototype
As we’ve finished with our JavaScript date and time prototypes, we’re in need of a new project. Just as I was hunting around for something fun to do, Steve Gibson mentioned Conway’s Game of Life on Security Now, and inspiration struck!
Conway’s game of life is not a game in the traditional sense, though it does fit the definition of a zero-player game. Life, as it’s often known, has its origins in some very dry theoretical computer science, yet it’s gone on to develop a cult following in the computer science world. Most of theoretical computer science is quite abstract, but Life is very visual and I think that’s why it’s so attractive. I think computer scientists love Life the same reasons mathematicians love fractals – they’re both just cool!
The reason I find Life fascinating is very simple – it illustrates very graphically how wrong humanity was for centuries in assuming that simple rules always lead to simple behaviours. This is true a lot of the time, but not all the time, and when that assumption breaks down, interesting things happen. The rules within Life are extremely simple, but the complexity of the behaviour that emerges from those simple rules can be amazingly complex.
Conway’s game of life is named for its creator, British mathematician John Horton Conway, who invented it in 1970. In fact, he didn’t just invent his game. In the process he also invented a whole new mathematical construct – the cellular automaton.
A cellular automaton is a regular grid of cells, each of which has a state. In the simplest case the state is simply on or off. The automaton rolls forward from one state to the next in unison, and the next state of each cell is determined by a function which takes as input only the following – its own current state, and the current state of the cells directly touching it in the grid.
Conway’s Game of Life is a two-state cellular automaton where each cell can be alive, or dead, and where the next state of each cell is determined by the following rules (from Wikipedia):
- Any live cell with fewer than two live neighbours dies, as if caused by underpopulation.
- Any live cell with two or three live neighbours lives on to the next generation.
- Any live cell with more than three live neighbours dies, as if by overpopulation.
- Any dead cell with exactly three live neighbours becomes a live cell, as if by reproduction.
Our project over the next few instalments will be to develop a JavaScript prototype for building arbitrary square-celled cellular automata with any number of possible states, and with support for any valid set of rules. We can then use this prototype to experiment with Conway’s Game of Life, and any other cellular automata that take our fancy.
Given that a cellular automaton is a grid of squares in rows and columns, we’ll be using a table to represent an automaton, with a table data cell (td tag) for each cell.
A Challenge
To get our new cellular automaton project started, the challenge for this instalment is to write the prototype bartificer.ca.Cell. This prototype will represent a single cell within an automaton. Included in the zip file for this assignment is a folder named pbs35-challenge-startingPoint. This contains the stub of a project folder for what will eventually become the bartificer.ca.js JavaScript API. It contains a number of project management files at the root level, all of which you can safely ignore for now, and three important folders which you can’t:
docs-dev- This folder contains developer documentation generated from my sample solution to this instalment. Because it’s developer documentation, it includes all the private variables and helper functions as well as the public API functions for the
bartificer.ca.Cellprototype. lib- This folder contains an empty file named
bartificer.ca.jsinto which you should add your code. test- This folder contains a full test suite for the
bartificer.ca.Cellprototype. The QUnit test runner istest/index.html, and the tests are contained intest/tests.js.
Using what we’ve learned about prototypes (culminating in the nine-step recipe in instalment 31), the test suite, and the provided developer documentation for the bartificer.ca.Cell prototype (specifically the file docs-dev/bartificer.ca.Cell.html), write a working version of the bartificer.ca.Cell prototype. You’ll know your code is correct when all the tests pass!
Note that I’ve marked all but the first test as todo, so you’ll need to change the tests from QUnit.todo to QUnit.test to enable them as your solution develops.
Final Thoughts
In this instalment we’ve learned how to use QUnit’s todo feature to effectively disable tests until we’re ready for them to be run, we’ve learned how to do basic text input on the web, and we’ve made a start on what I hope will be a fun new JavaScript project.
In the next instalment we’ll learn about more specific kinds of text input on the web, and we’ll continue work on our new JavaScript project.