PBS 20 of X: JS in the Browser
After six instalments, it’s finally time to bring our JavaScript knowledge into the web browser. We’ve already learned that HTML is used to specify the structure of a web page and CSS to specify its appearance. So where does JavaScript come in? JavaScript’s primary use on the web is to add interactivity and/or automation of some kind. For example, clicking on something could cause the page to change in some way, or icons could be automatically injected into the page to mark links that open in new tabs as being different to other links.
A key point to note is that HTML, CSS, and JavaScript are all so-called client-side technologies. It’s the web browser doing the work, not the web server. The web server simply delivers the HTML, CSS, and JavaScript code to the browser as text, just as you type it. The browser then interprets that code and turns it into the web page you see and interact with.
Matching Podcast Episode 453
Listen Along: Chit Chat Across the Pond Episode 453
You can also Download the MP3
A Solution to the PBS 18 Challenge
The challenge set at the end of PBS 18 was to create prototypes representing IP addresses and subnets, to test them by using playground inputs 1 and 2 to create a subnet object, and to test if an IP address from playground input 3 is contained within that subnet or not.
As always, I want to stress that there are an infinity of possible correct solutions, so this is just my solution. Your code can be different from mine and yet still totally correct.
//
// === Define the IP Address Prototype ===
//

// -- Function --
// Purpose    : Constructor for the IP prototype
// Returns    : NOTHING
// Arguments  : 1) OPTIONAL - an IP address as a string or array
// Throws     : An Error if an invalid argument is passed
// Notes      : Sets the initial value by calling parse()
// See Also   : IP.prototype.parse()
function IP(ip){
  // default to 0.0.0.0
  this._ip = [0, 0, 0, 0];

  // if we were passed an argument, try set it
  if(ip){
    this.parse(ip);
  }
}

// -- Function --
// Purpose    : set stored value
// Returns    : a reference to self to facilitate function chaining
// Arguments  : 1) an IP address as a string
//                  --OR--
//              1) an IP address as an array of 4 integers
// Throws     : An Error on invalid arguments
IP.prototype.parse = function(ip){
  var newIP = [];

  // see if we got an array or a string - save to newIP
  if(ip instanceof Array){
    // we got an array, so save it directly
    newIP = ip;
  }else if(typeof ip === 'string' && ip.match(/^\d{1,3}([.]\d{1,3}){3}$/)){
    // we got a valid string, so split it into an array
    newIP = ip.split('.');
  }else{
    // we got an invalid value, throw an Error
    throw new Error('Invalid IP: ' + ip);
  }

  // make sure the array is all valid
  if(newIP.length != 4){
    throw new Error('Invalid IP: ' + ip);
  }
  newIP.forEach(function(quad, i){
    // first force the quad to an integer
    quad = parseInt(quad)
    newIP[i] = quad;

    // then make sure it is in the valid range
    if(quad < 0 || quad > 255){
      throw new Error('Invalid IP: ' + ip);
    }
  });

  // if we got here, the new IP is valid, so save it
  this._ip = newIP;

  // return a reference to self
  return this;
};

// -- Function --
// Purpose    : get the IP as an array
// Returns    : An array of integers
// Arguments  : NONE
// Throws     : NOTHING
// Notes      : Returns a clone of the internal state, not a reference
IP.prototype.toArray = function(){
  return this._ip.join('.').split('.'); // clone by going via a string
};

// -- Function --
// Purpose    : get the IP as a String
// Returns    : A string
// Arguments  : NONE
// Throws     : NOTHING
IP.prototype.toString = function(){
  return this._ip.join('.');
};

//
// === Define the Subnet Prototype ===
//

// -- Function --
// Purpose    : Constructor for the Subnet prototype
// Returns    : NOTHING
// Arguments  : 1) an IP object
//              2) a Class specifier - A, B or C
// Throws     : An Error on invalid arguments
function Subnet(ip, c){
  // make sure get got valid args
  if(!(ip instanceof IP)){
    throw new Error('Not an IP Object: ' + ip);
  }
  if(!(typeof c === 'string' && c.match(/^[ABC]$/i))){ // case insensitive match
    throw new Error('Not a Subnet Class: ' + c);
  }

  // store the data
  this._ip = ip;
  this._class = c.toUpperCase(); // force upper case
}

// -- Function --
// Purpose    : Return the subnet as a string
// Returns    : A string
// Arguments  : NONE
// Throws     : NOTHING
Subnet.prototype.toString = function(){
  // start with the IP
  var ans = this._ip.toString();

  // append the / and the first 255
  ans += '/255.';

  // append the appropriate middle bit of the mask
  if(this._class == 'A'){
    ans += '0.0';
  }else if(this._class == 'B'){
    ans += '255.0';
  }else{
    ans += '255.255';
  }

  // append the end of the mask
  ans += '.0';

  // return the string
  return  ans;
};

// -- Function --
// Purpose    : Test if an IP is in this subnet
// Returns    : true if the IP is in the subnet, false otherwise
// Arguments  : 1) the value to test
// Throws     : NOTHING
// Notes      : Returns false if the argument is not an IP object
Subnet.prototype.test = function(ip){
  // make sure we were passed an IP object
  if(!(ip instanceof IP)){
    return false;
  }

  // get the internal ip and the one to test as arrays
  var netIP = this._ip.toArray();
  var testIP = ip.toArray();

  // test that the appropriate parts of the quad match

  // first bit always has to match
  if(testIP[0] != netIP[0]){
    return false;
  }

  // second bit needs for match for B & C only
  if((this._class == 'B' || this._class == 'C') && testIP[1] != netIP[1]){
    return false;
  }

  // third bit needs to match for C only
  if(this._class == 'C' && testIP[2] != netIP[2]){
    return false;
  }

  // if we got here, all is well, so return true
  return true;
};

//
// === Use Prototypes to Test Inputs ===
//

// if there are inputs, try process them, otherwise, give a meaningful message
if(pbs.inputs().length > 0){
  // try process the inputs
  try{
    // create a subnet object from inputs 1 & 2
    var subnet = new Subnet(new IP(pbs.input(1)), pbs.input(2));

    // create an IP object from input 3
    var testIP = new IP(pbs.input(3));

    // test if the IP is in the subnet
    if(subnet.test(testIP)){
      pbs.say(testIP.toString() + ' IS in the subnet ' + subnet.toString());
    }else{
      pbs.say(testIP.toString() + ' is NOT the subnet ' + subnet.toString());
    }
  }catch(err){
    pbs.say("PROBLEM - " + err.message);
  }
}else{
  pbs.say("To test an IP against a subnet, enter an IP within the subnet in input 1, a class in input 2 (A, B, or C), and the IP to test in input 3");
}
I want to draw your attention to some key points in this solution.
Firstly, like previous examples and solutions, the code in the object prototypes remains defensive – arguments are not assumed to be correct, but are checked. What has changed from previous examples is how the functions within the prototype respond to invalid data – instead of printing a message or returning a special value, they throw an error.
By writing the prototypes in such a way that they throw errors, the code for using the prototypes can be simplified. All code that could trigger errors is wrapped in a single try block, and all possible errors are dealt with within a single catch block.
Secondly, a lot of the data validation is done through regular expressions.
Finally, built-in JavaScript functions like .split() and .join() are used to convert strings to arrays and vice-versa.
Introducing the JavaScript Console
Every modern web browser (including Edge, but not IE) provides a JavaScript console of some kind. This console is for use by developers, not end users. It provides a place where error messages and debug messages can be sent, as well as an interactive JavaScript terminal into which we can enter commands and see their results.
A JavaScript console does not belong to a given window, but to a given open tab. When you use the console you are interacting with a specific web page in a specific tab. If you use that console to run JavaScript code that alters the appearance of the page, you’ll see those changes happen in real time. You can also have multiple consoles open at any time, just like you can have multiple pages open in multiple windows and tabs.
Most browsers allow you to have the console appear as a sidebar (or bottom bar) within a tab, or, as a detached floating window. I prefer floating windows, but to each their own!
The exact mechanisms for accessing and using these consoles vary from browser to browser, as indeed do the names the browsers use to describe them. My absolute favourite remains the one in Safari; so I do all my development work in that browser. But to remain cross-platform, we’ll use the FireFox console here.
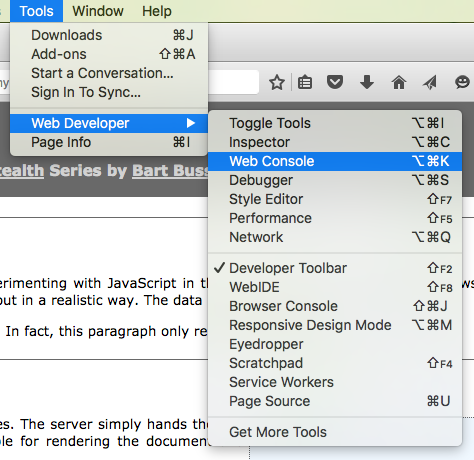
To test the console, let’s open a dummy page in FireFox, and then activate FireFox’s console on that page. You can access the dummy page on my server, or you can download the code or here on GitHub and run it in your own local server. Once you have the page open, go to the Tools menu, then to Web Developer, and click on Web Console.

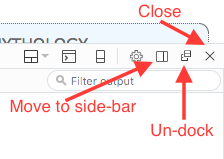
By default, this should open the console in a docked region at the bottom of the browser window.

The buttons at the top-right of this region allow you to close the console, undock it so it becomes a floating window, or change it to a side bar. I like to undock it; so that’s how you’ll see it in my screenshots.

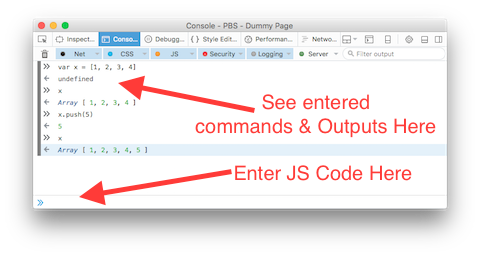
The bar at the top of the console region lets you control what messages you see. Messages from different origins will have different colours. You can control the messages from each origin that you see with the colour-coded drop-down menus starting at the left of the bar. At the far left of the bar is a trashcan icon which will empty the console, removing all messages. The right of the bar contains a search box that you can use to do realtime filtering of the messages show in the console.

At the bottom of the console you’ll see a text box next to a double chevron – that’s effectively a JavaScript command prompt. You can enter JavaScript code there and hit enter to run it. If the executed code returns a value, that will be printed to the console. The console is smart enough to sensibly render more complex data structures like arrays and objects.

Try it out by entering the following (one-by-one):
35 + 9var x = 5;var y = x + 6;ylocation.hrefdocument.titlewindow.innerWidthvar myObj = {key1: 'a string', key2: true, key3: 42}myObjMath.random()
The Document Object Model (DOM)
The browser uses JavaScript objects to represent just about everything about the current web page and browser window. You can use these objects to alter the page and interact with the user. The window/tab containing the page is represented by the window object. The current URL of the page is accessed through the location object. Most important of all, the structure of the web page is represented by the document object. This object allows you access to every property of every HTML tag on the page, and all the CSS attributes belonging to each of those objects. Together, these objects are known as the Document Object Model, or DOM.
Using the core JavaScript language and the DOM, it is possible manipulate the structure of web pages: to make things appear and disappear, to reorder elements on the page, to change the rendering of any element on the page, to remove elements from the page, and to add elements into the page.
We can interact with the DOM through the JavaScript console. Try the following (one-by-one):
location.hrefdocument.titlewindow.innerWidthwindow.alert("I'm an annoying alert!")if(window.confirm("You happy for me to annoy you again?")){window.alert("another dumb alert!")}document.getElementById('as_ajax').style.borderWidth = "5px"
It’s possible to use only the DOM and the core JavaScript language to bring web pages to life. But, while the DOM is very good at representing the structure of a web page as editable objects, the functions it provides for manipulating the data leave a lot to be desired. For this reason, a number of third-party libraries have sprung up to make interactions with the DOM easier and more efficient. These third-party libraries act as a kind of middleware between you the developer and the DOM. At the end of the day, the same DOM functions will get called, but via code that is easier to read and write, and hence, maintain.
I thought long and hard about whether to do pure JavaScript + DOM in this series, or whether to use one of the common third-party libraries. In the end, I opted to use a third-party library, specifically jQuery.
My reasons are twofold. Firstly, pure JavaScript + DOM code is much harder to learn. And secondly, it’s been years since I programmed in pure JavaScript + DOM, and I’ve been a jQuery user for the better part of a decade. I don’t feel comfortable teaching techniques I don’t actually use myself in the real world. So, since all my web work in recent years has been built using jQuery, that’s what I’ve chosen to teach in this series.
So, from here on in we will be using the jQuery JavaScript library to interact with the DOM.
Introducing jQuery
The entire jQuery API is presented out through a single object called jQuery. By default, a reference to the jQuery object is also saved to a variable in the global scope simply named $. This is a legal variable name that’s both short and easy to type, and distinctive enough to stand out. Almost all jQuery code you see on the net uses the variable $ rather than the variable jQuery to interact with the jQuery library, and that’s what we’ll do in this series too.
When working with jQuery, you generally start by asking jQuery to query the DOM for one or more elements on the page, and then you either interrogate those elements, or alter them in some way. The $ object can be called as a function, and when passed a CSS-style selector as the first argument, it will return a jQuery object representing all matching elements in the page. Query objects are array-like structures, and most consoles show them as arrays of HTML code.
jQuery objects contain a large number of functions. When invoked, these functions will operate on all the HTML elements the object represents.
Philosophically, jQuery likes to keep function names short. Also it likes to use the same function to query and alter a value, or to add and execute an event handler.
As a quick example, we can get the current href attribute of all a tags in the dummy page by executing the following in the console:
$('a').attr('href');
What you’ll see is that, when querying against multiple elements (there are many links on the page), the value you get back is the value from the first element in the set. In general, you would use a more specific selector to target exactly the a tag whose href you wanted to query.
Now, we can use the same function to set the href of every link to go to http://www.podfeet.com/ like so:
$('a').attr('href', 'http://www.podfeet.com/');
If you click on any link now, it will take you to Allison’s website!
To get the dummy page back to normal, simply refresh the page in your browser.
Also philosophically, jQuery’s API is designed to facilitate function chaining. Any function that does not need to return a value returns a reference to the object it was called on. This allows you to do things like empty an element and inject new text into it in a single line of code by chaining calls to .empty() and .text(). The following example will select all a tags, empty them of all content, and then inject the text ‘boo!’ into them:
$('a').empty().text('boo!');
Conclusions
We’ve now had a small taste of what JavaScript can do in the browser and seen just a hint of what jQuery can do for us. In the next instalment we’ll do a much more detailed introduction to jQuery, starting with how jQuery allows you to pinpoint exactly the elements of a page you want to address, before moving on to look at how jQuery can interact with the CSS properties of HTML elements, and with the attributes of HTML elements.
Playing around in the console is a nice way to experiment with JavaScript in the browser, but of course you can embed JavaScript code directly into web pages. We need to learn a little more about jQuery before we’re ready to take that next important step though.
