PBS 129 of X: ESLint (by Helma van der Linden)
This instalment was written by guest-instructor Helma van der Linden.
A linter
In this instalment we are going to expand our toolbox with a linter. A linter analyses your code for bugs and programming errors, and suggests code improvements. Think of it as your little helper that nudges you to write better and more consistent code. The name linter is actually derived from the fluff you find in your dryer and the linter was invented in 1978, so the concept is really old, if you count in computer time. 😉
Matching Podcast Episode
Listen along to this instalment on episode 705 of the Chit Chat Across the Pond Podcast.
You can also Download the MP3
Why Do You Need a Linter?
You might wonder why you would need a linter. After all, you can do everything a linter does, and of course you’re already trying your very best to write good and consistent code. All that is true, but how about you’ve nicely indented your code and then you have a bug to fix and all of your lines are changed. I find that manually reindenting my code gets old very fast.
Remember a bug in SSL Bart told us about ages ago? This was caused by a programmer who added a second line of code to an if-statement and forgot to add the squiggly brackets. These kinds of bugs are very difficult to spot when your code is not properly indented.
A linter can do all these little chores for you and keep your code consistent. Consistent as in, “do I put my opening squiggly bracket at the end of the if-statement or function declaration or on the line below?”, and “do I add spaces around operators or not?”. Programmers can go to war on these questions. It’s a matter of picking a style and sticking with it and this is exactly what a linter can do for you: enforce the code style.
What is a Code Style?
A code style is nothing more than a set of rules that define things such as where does the opening squiggly bracket go, how much spaces to indent a line, whether to use spaces or tabs for indents, but also, always add squiggly brackets to an if-statement, and always finish a line with a semicolon. These rules can be wrapped up in a configuration that can be shared between projects and, more importantly, between team members. The latter prevents the wars on code styles and makes sure everyone is able to read the code another team member has written. Basically, it’s an opinion about how the code should look and the linter is there to help you make the code look like that opinion.
What is ESLint?
ESLint is a linter, specifically written for JavaScript or ECMAScript. It’s written in NodeJS, which is also JavaScript, so it’s a matter of eat your own dog food. It’s an open source project that has a plugin architecture so people can write and contribute their own plugins. In fact, each rule it needs to enforce is a separate plugin, making them easy to turn on or off, or add more by adding plugins.
2025 Update: While ESLint is still the tool to use to ensure your ECMAScript (aka JavaScript) code is error free, the details of how to use it have changed. Furthermore, it is no longer a tool to enforce coding style. As of ESLint version 8.53.0, formatting rules are deprecated. And as of ESLint version 9.0.0, the .eslintrc file has been deprecated, and replaced by the eslint.config.js file. And while the .eslintrc method can still be used, ESLint users are strongly encouraged to switch to the new ‘flat config system’.
Thus, as you enjoy listening to this episode and following along with these show notes, understand that the theory of using a linter is still correct, but the implementation details for ESLint no longer are. Information about the deprecation of formatting rules can be found in this blog post:
Deprecation of formatting rules
And information about the change from .eslintrc to eslint.config.js can be found in these ESLint blog posts:
Installing ESLint
Let’s get to work and install ESLint. The easiest way to install ESLint is to use npm (See pbs127 on how to install npm itself).
Go into your project root directory, and run the command below to install ESLint. If you don’t have a project at hand, we’ll be using the Sleeps to Christmas project as an example from instalment pbs127. I’ll assume you’ve followed the instructions and now have a pbs127a-s2xmas folder. If you don’t still have the file, you can download it from this zip file.
Start by entering the following command in your Terminal window.
npm install eslint --save-dev
This command tells npm to install ESLint in the dev part of package.json. Since it’s a tool that is not necessary for running the application, and only used while developing, package.json allows you to neatly separate the dev tools from the production dependencies.
ESLint does not impose a code style on you, but it does come with a standard configuration of sensible rules. For that you need to initialise a configuration for ESLint to work with.
./node_modules/.bin/eslint --init
You will be asked several questions.
- The first question is what you would like ESLint to do. You can go all in by selecting the last option,
To check syntax, find problems, and enforce code style. - The next question is about the type of modules you use. The default
JavaScript modules (import/export)is fine. - Next you’ll be asked if you want either the React or Vue.js framework, but this project doesn’t use any of these popular frameworks, so select
None of theseon the next question. - The project also doesn’t use TypeScript, so the default is correct too.
- This is a NodeJS project, so select
Nodefor where the code runs, rather than in the browser. - The next question is about the style guide to use. Select
Use a popular style guideand then selectStandard. - Next, you’ll be asked in what format do you want your configuration written? I chose
JavaScriptbut you could also choose.json. - ESLint will then ask if it can install more packages, because the chosen configuration depends on it. Just select the default answer
Yes.
The result of this initialization command should be the creation of a .eslintrc.js configuration file. In my case, I got an error and no eslintrc file, so I just ran the command again with the same answers, and this time all went fine and the file was created.
This is the content of my .eslintrc.js.
module.exports = {
  env: {
    es2021: true,
    node: true
  },
  extends: [
    'standard'
  ],
  parserOptions: {
    ecmaVersion: 12,
    sourceType: 'module'
  },
  rules: {
  }
}
ESLint is now ready to get to work. First, make a copy of s2xmas.mjs to s2xmas-bart.mjs so we can remember the style Bart used.
Then, let’s try ESLint on his file. Enter the following command:
./node_modules/.bin/eslint s2xmas.mjs
This is the output you should see:
/path/to/pbs127a-s2xmas/s2xmas.mjs
   1:20  error  Strings must use singlequote                      quotes
   1:28  error  Extra semicolon                                   semi
   3:21  error  Extra semicolon                                   semi
   4:1   error  Expected space(s) after "if"                      keyword-spacing
   4:44  error  Missing space before opening brace                space-before-blocks
   5:1   error  Unexpected tab character                          no-tabs
   5:1   error  Expected indentation of 2 spaces but found 1 tab  indent
   6:1   error  Unexpected tab character                          no-tabs
   6:1   error  Expected indentation of 2 spaces but found 1 tab  indent
   7:2   error  Expected space(s) before "else"                   keyword-spacing
   7:2   error  Expected space(s) after "else"                    keyword-spacing
   8:1   error  Unexpected tab character                          no-tabs
   8:1   error  Expected indentation of 2 spaces but found 1 tab  indent
   8:60  error  Extra semicolon                                   semi
   9:1   error  Unexpected tab character                          no-tabs
   9:1   error  Expected indentation of 2 spaces but found 1 tab  indent
   9:2   error  Expected space(s) after "if"                      keyword-spacing
   9:49  error  Extra semicolon                                   semi
  10:1   error  Unexpected tab character                          no-tabs
  10:1   error  Expected indentation of 2 spaces but found 1 tab  indent
  10:65  error  Extra semicolon                                   semi
  11:1   error  Unexpected tab character                          no-tabs
  11:1   error  Expected indentation of 2 spaces but found 1 tab  indent
  11:55  error  Extra semicolon                                   semi
  12:2   error  Newline required at end of file but not found     eol-last

✖ 25 problems (25 errors, 0 warnings)
  19 errors and 0 warnings potentially fixable with the `--fix` option.
According to our Standard code style, there is a lot that ESLint is not happy with. It shows a list of line and character positions where the code is found. For example, the first entry in the list says 1:20, which means line 1 character 20. The next column explains if it’s an error or merely a warning. The third column is an explanation of why ESLint thinks it’s wrong and the last column has the name of the rule that triggered the error.
As you can see, there are a lot of errors caused by the same rules. Below is a helpful hint that most of the errors can be fixed using the --fix option. Let’s try that:
./node_modules/.bin/eslint --fix s2xmas.mjs
The resulting s2xmas.mjs now looks like this:
import moment from 'moment'

const now = moment()
if (now.date() === 25 && now.month() === 11) {
  // it's Christmas!
  console.log("No more sleeps — it's Christmas 😀🎄🎁")
} else {
  const xmas = moment(now.startOf('day')).date(25).month(11)
  if (now.isAfter(xmas)) xmas.year(now.year() + 1)
  const numDays = Math.abs(now.startOf('day').diff(xmas, 'days'))
  console.log(`${numDays} sleeps 😴 till Christmas 🎄`)
}
If you compare that to s2xmas-bart.mjs you will see this linted version has more spaces around ‘else’, no trailing semicolons, and ‘moment’ in the first line is now wrapped in single quotes, rather than double quotes.
Customising
This looks much more consistent, but I personally prefer the semicolons at the end. There are 2 ways to override the rules in your chosen style. One is to add a configuration comment directly in the file in question. This is a command to tell ESLint to behave differently from the rules in the configuration, but wraps the instruction in comments so the JavaScript engine (whether a browser or NodeJS) doesn’t get confused. The other method is to add a rule to .eslintrc.js which would affect the entire project.
In this case it doesn’t matter whether to use a configuration comment or a rule in the configuration file, but when we have multiple files, the configuration file is the best option. So let’s do that first. In order to find the rule we need, check the Rules section of the ESLint User Guide. We know from the output of running the linter from the command line that we need to look up the semi rule in the documentation. Do read the explanation to find out if that is the correct rule and how to set it.
As we only want to change one rule of the standard code style, we use the extend syntax and only add the rules we want to enforce differently to the rules section. ESLint has already set this up for use, so there is already an extends section and an empty rules section. We want the semicolons to be added and give an error when they are not there. So the correct configuration we want is:
"semi": ["error", "always"]
Add this to the rules section and the file looks like this.
module.exports = {
  env: {
    es2021: true,
    node: true
  },
  extends: [
    'standard'
  ],
  parserOptions: {
    ecmaVersion: 12,
    sourceType: 'module'
  },
  rules: {
	  "semi": ["error", "always"]
  }
}
Now let’s look what ESLint makes of this. First copy the s2xmas.mjs file to s2xmas-standard.mjs so you can see the difference later using diff or your favourite code editor.
First run the eslint command without the fix, so you can see that ESLint now complains about missing semicolons. Use the --fix option again, and now ESLint has added the semicolons.
ESLint in the Code Editor
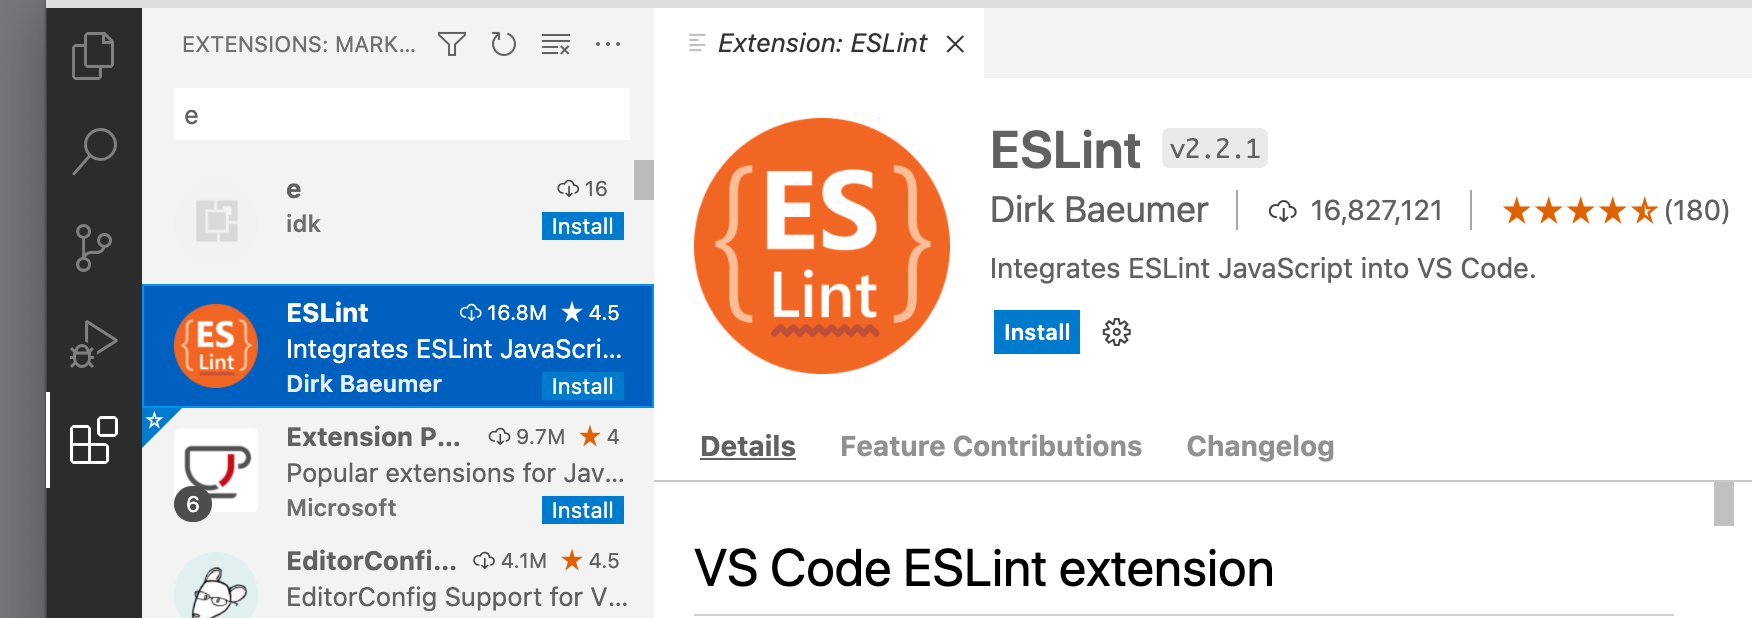
Running ESLint from the command line gets tedious very quickly, so let’s use a plugin for our code editor. I will use VSCode which is currently my editor of choice. And because it’s free, you don’t have to spring a lot of money to follow along with this instalment. If you don’t use VSCode, it’s good to know that nearly every code editor with support for plugins has an ESLint plugin. Since this is not a tutorial on how to install and set up VSCode, I’ll refer you to the documentation on their website to get started. For installing an extension (VSCode speak for a plugin) you can find information in this section
Install the ESLint extension. It’s very popular, so a short search will reveal it quickly.
Open the Settings for VSCode and update the ESLint configuration. You can do this at the user level, so you only have to do it once for all projects you work on in VSCode, or you can do it per workspace. In VSCode, a workspace is a folder with a project in it.
If you prefer a setting per workspace, open the project directory first and then change the settings. If you might need to use different style guides for different projects, choose to run on a per-workspace basis.

You can leave most of ESLint at the default settings, but I prefer to have the ESLint status shown in my status bar, so I can see immediately when it has problems.
All settings you change from the default end up in a settings.json file, whether at user level or at workspace level, so rather than going through each setting, I’ll just show my settings.json after making my preferred changes. You can simply copy the contents of the file into your own settings.json if you want to use these too.
A quick way to get to the correct file in VSCode is to go to the Settings, select either User or Workspace and find a link Edit in settings.json. Click the link and VSCode will open the correct settings.json.
{
	"workbench.colorTheme": "Default Light+",
	"eslint.alwaysShowStatus": true,
	"eslint.format.enable": true,
	"eslint.lintTask.enable": true,
	"editor.formatOnSave": true,
	"editor.codeActionsOnSave": {
		"source.fixAll.eslint": true
	}
}
The first line sets the colorTheme. I like a light theme, but your mileage may vary. The next settings configure ESLint in VSCode. The first is to always show the status of ESLint in the status bar. The second sets up ESLint as a code formatter, which means that ESLint will also take care of indents and spaces. eslint.lintTask.enable allows ESLint to analyse all files in the workspace.
Finally, there are 2 settings I cannot live without. They make sure that when saving a file ESLint will fix all problems so your code doesn’t get saved with lint errors.
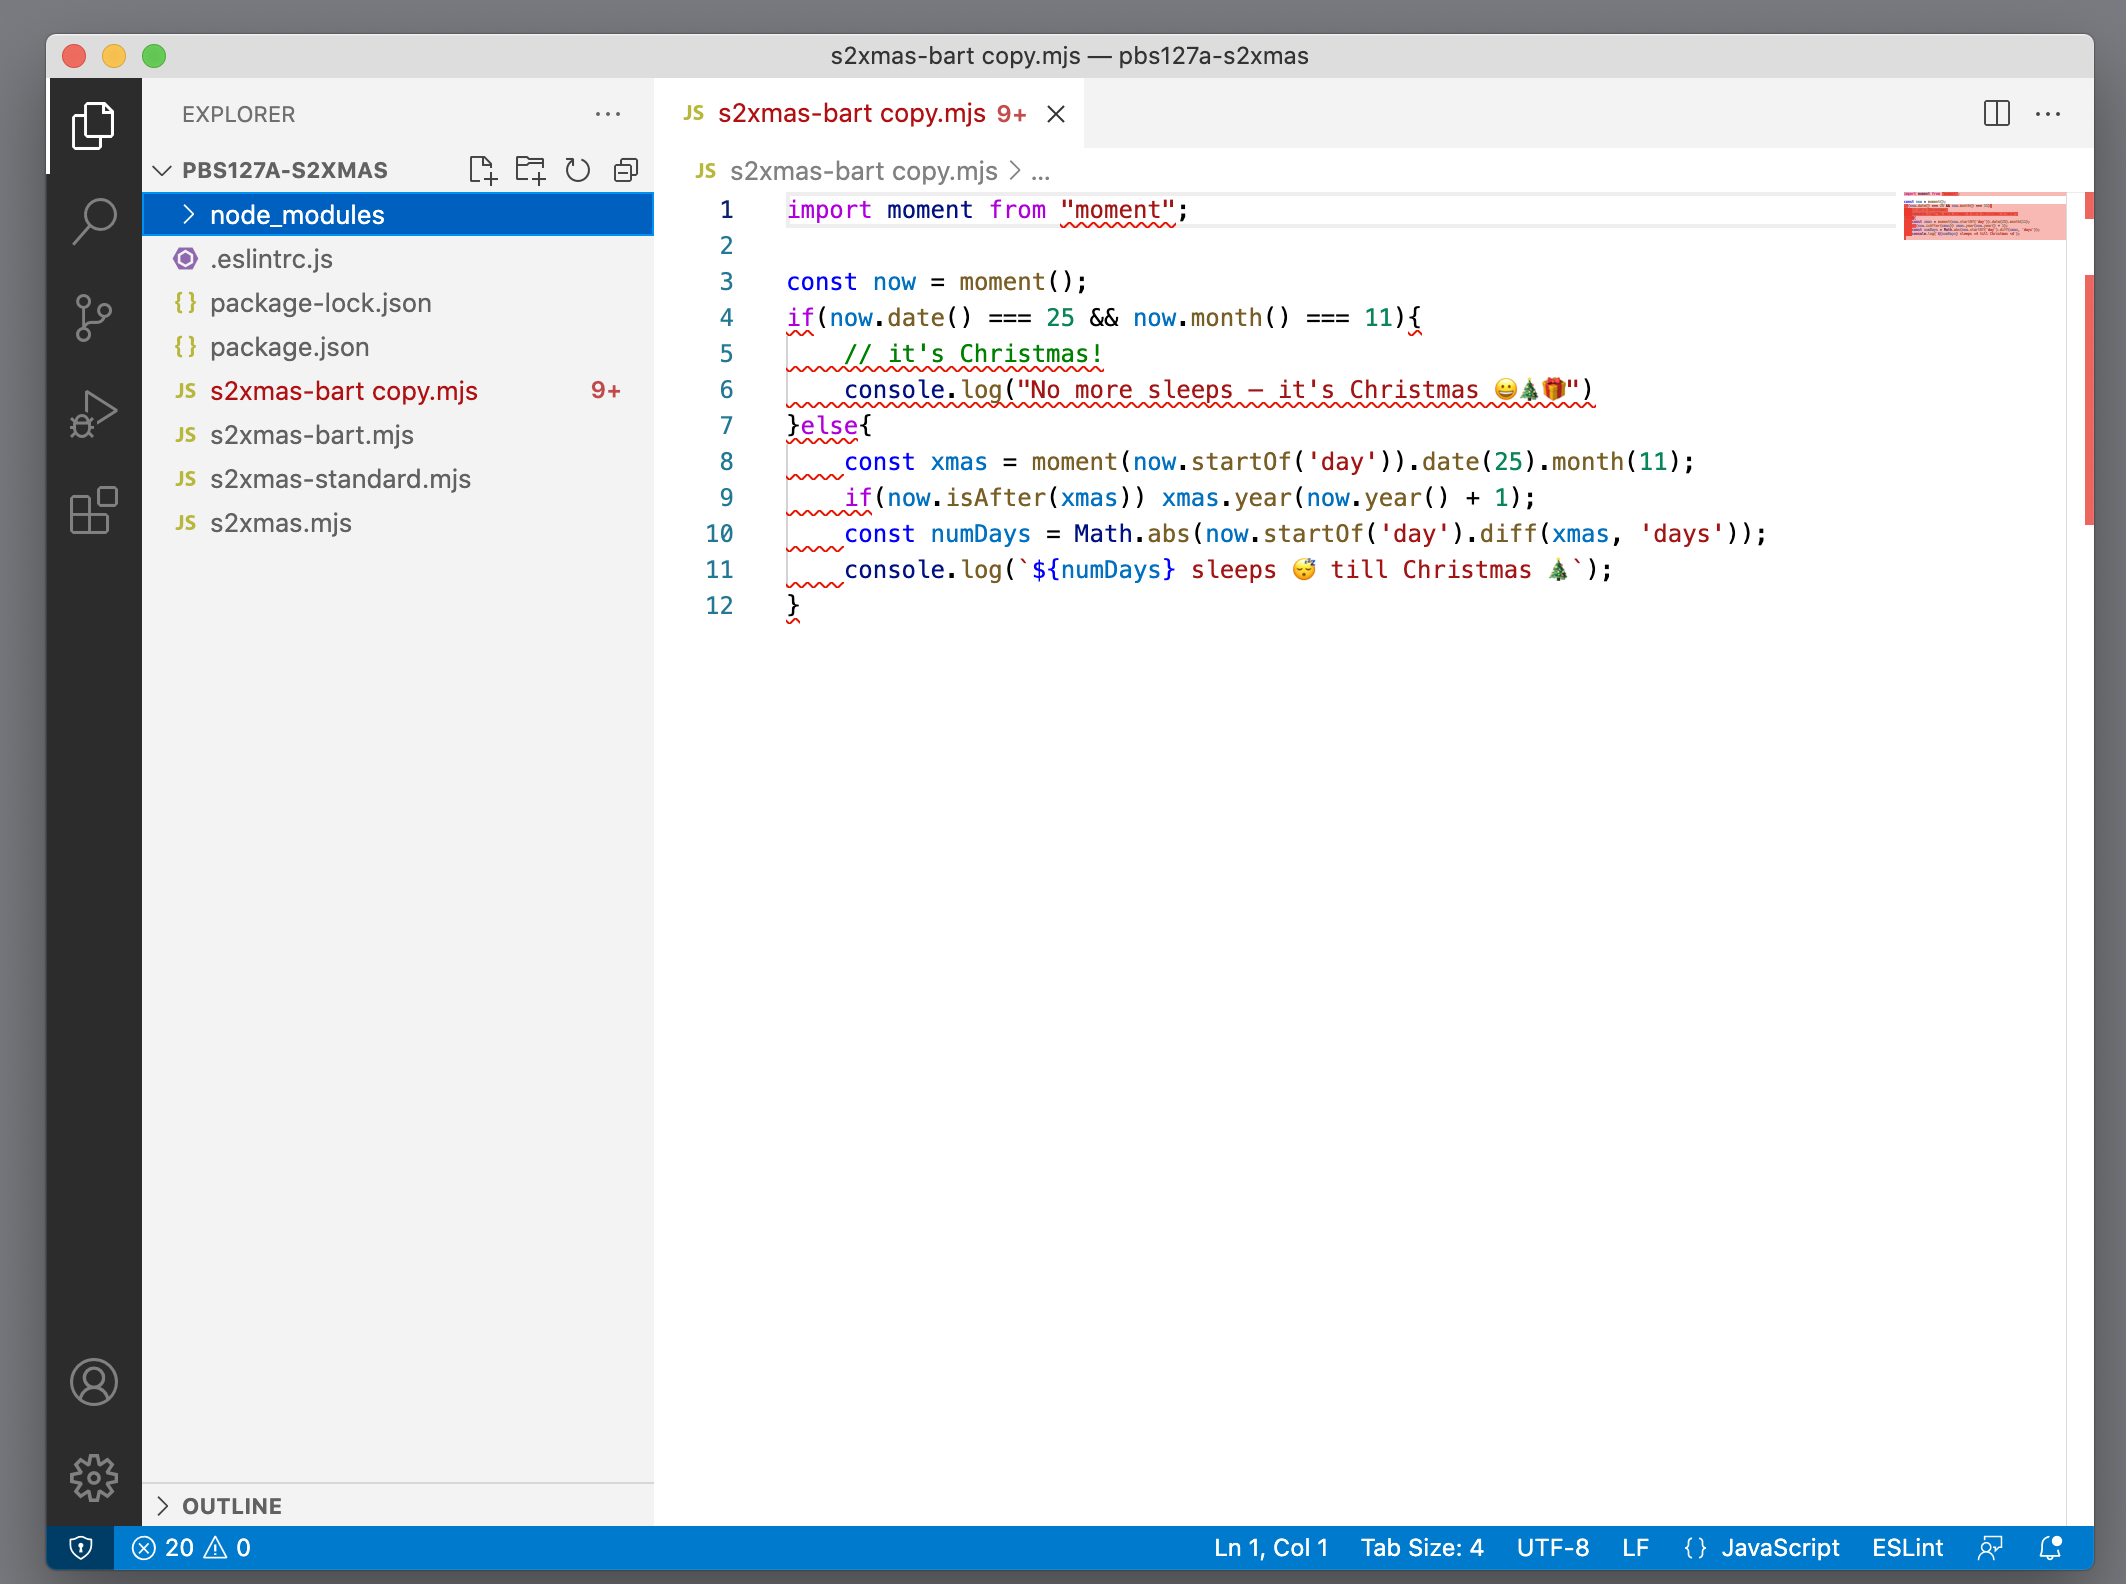
Let’s see how this works in VSCode. Make a copy of s2xmas-bart.mjs so we can repeat what we did at the command line, and open the copy in VSCode.
Every line or part of the line that ESLint has a problem with will be underscored with a red wavy line. Did you notice that the ESLint extension in VSCode picks up the ESLint configuration in .eslintrc.js?
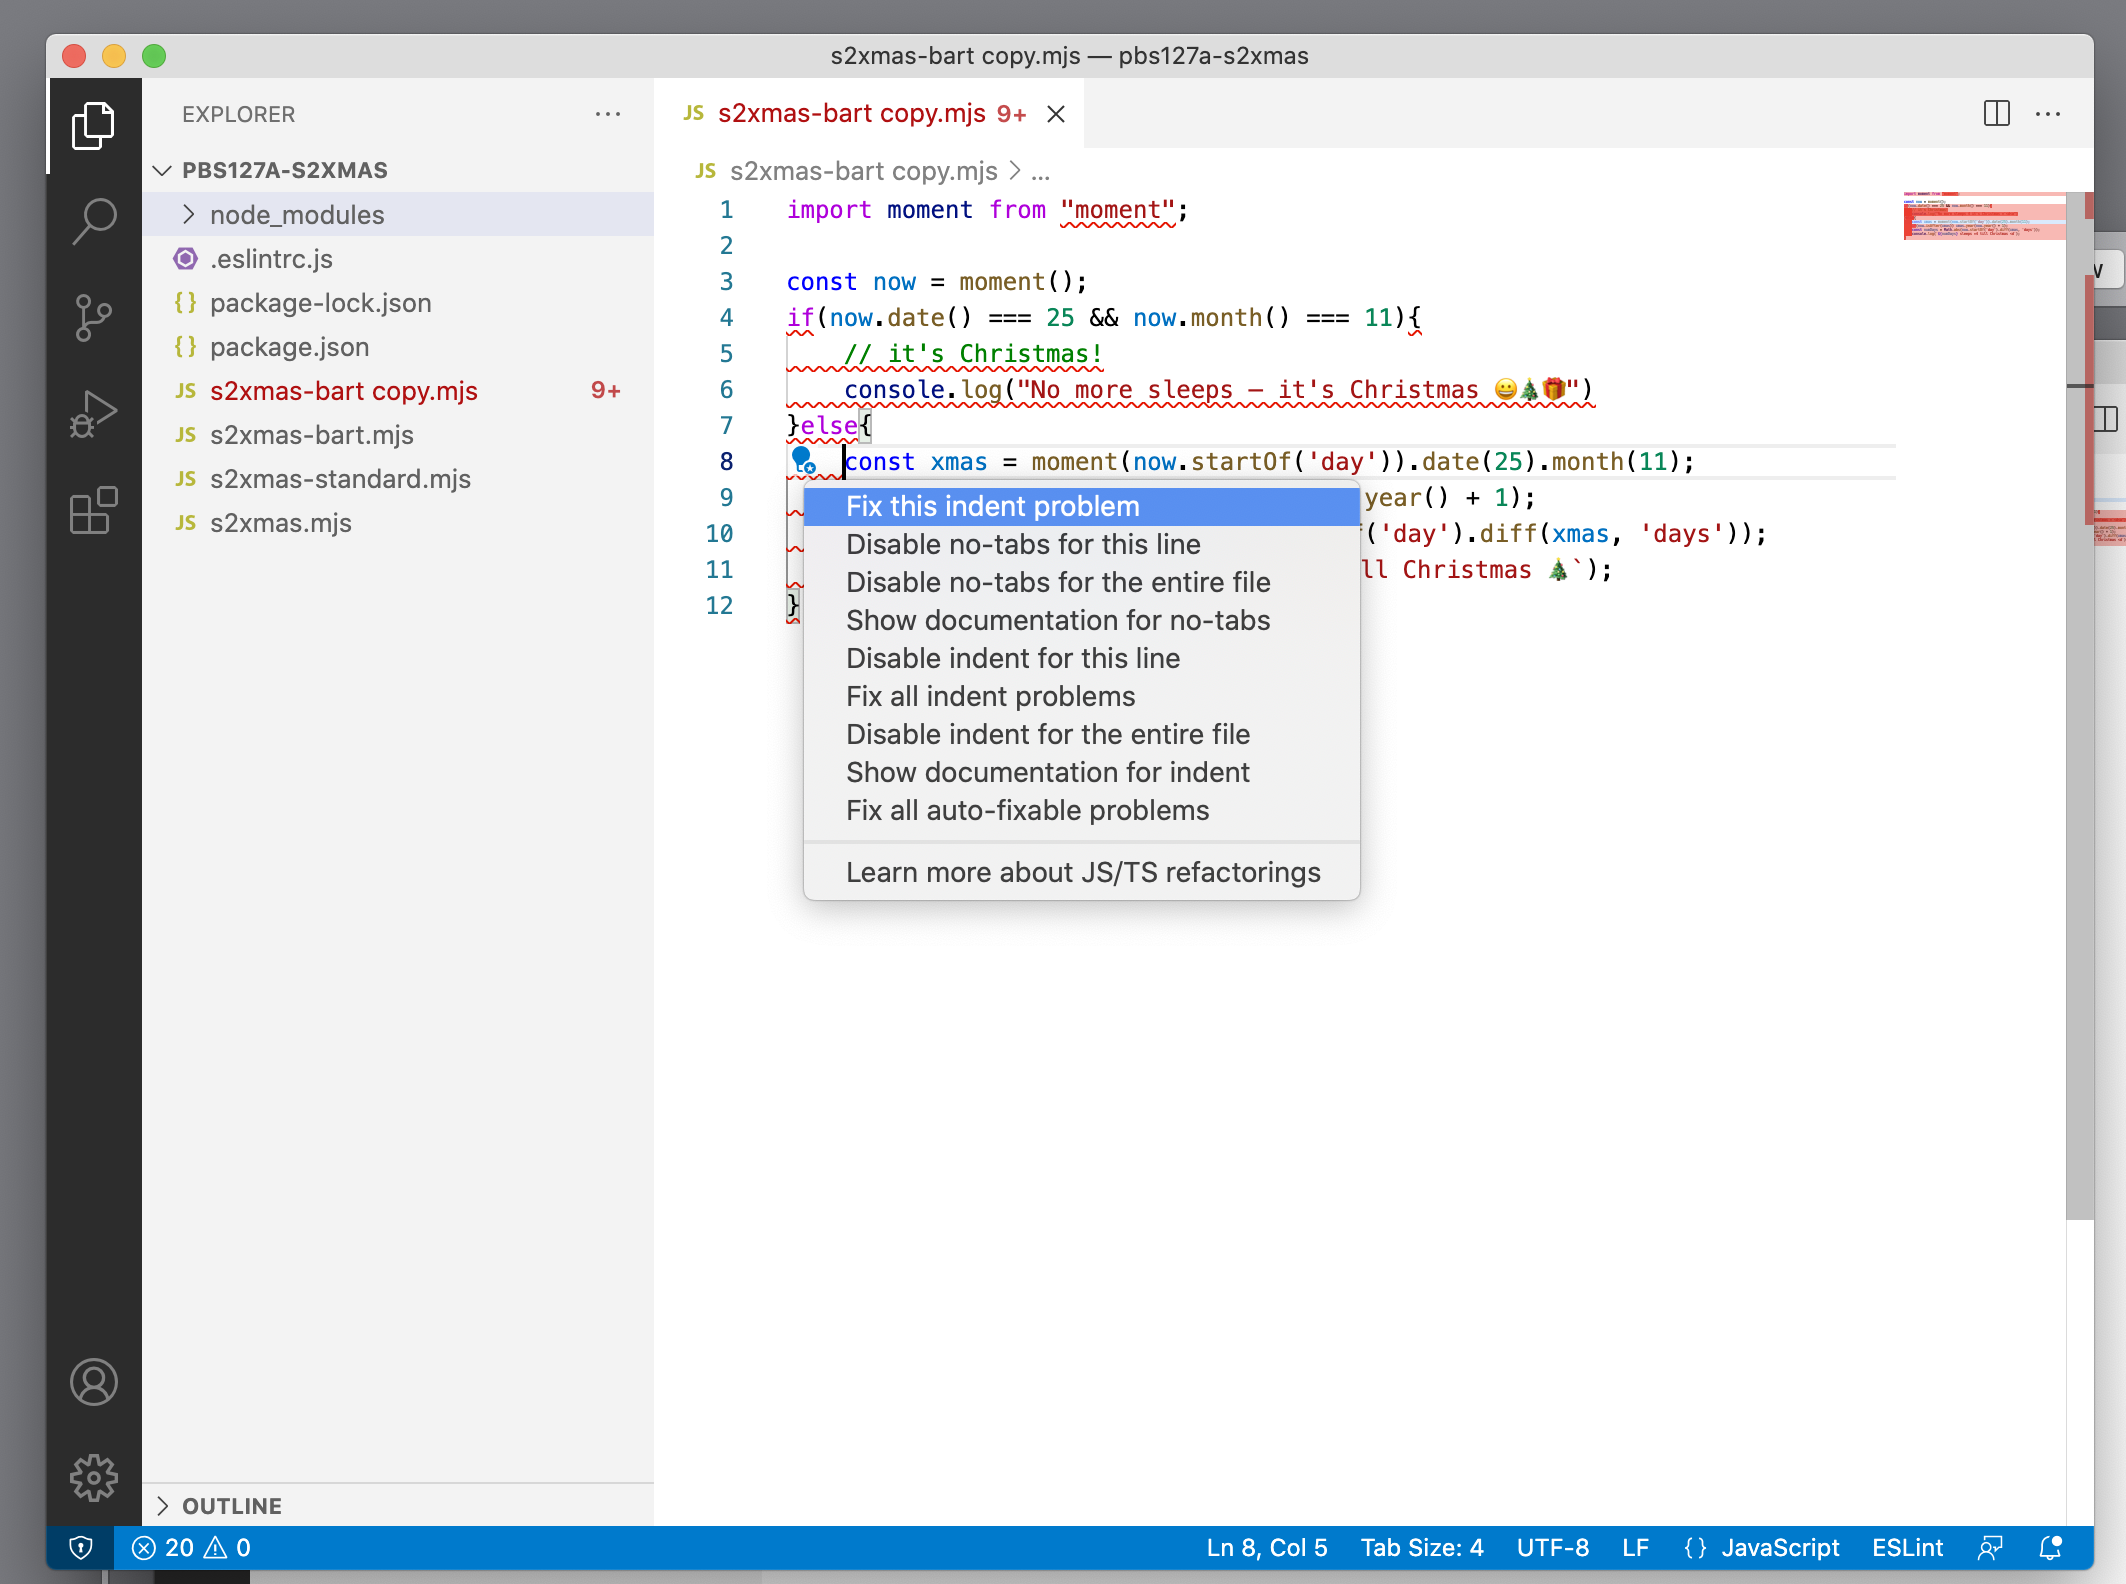
If you click to the right of each wavy line, a little blue balloon-like icon is shown.
![]()
If you click the blue balloon icon, you will get a menu that shows several options on how to fix the problem. There are options to just fix the problem in the current line or in the entire file, fix all problems in the file, disable the problem for this line only or for the entire file and show documentation on the rules.
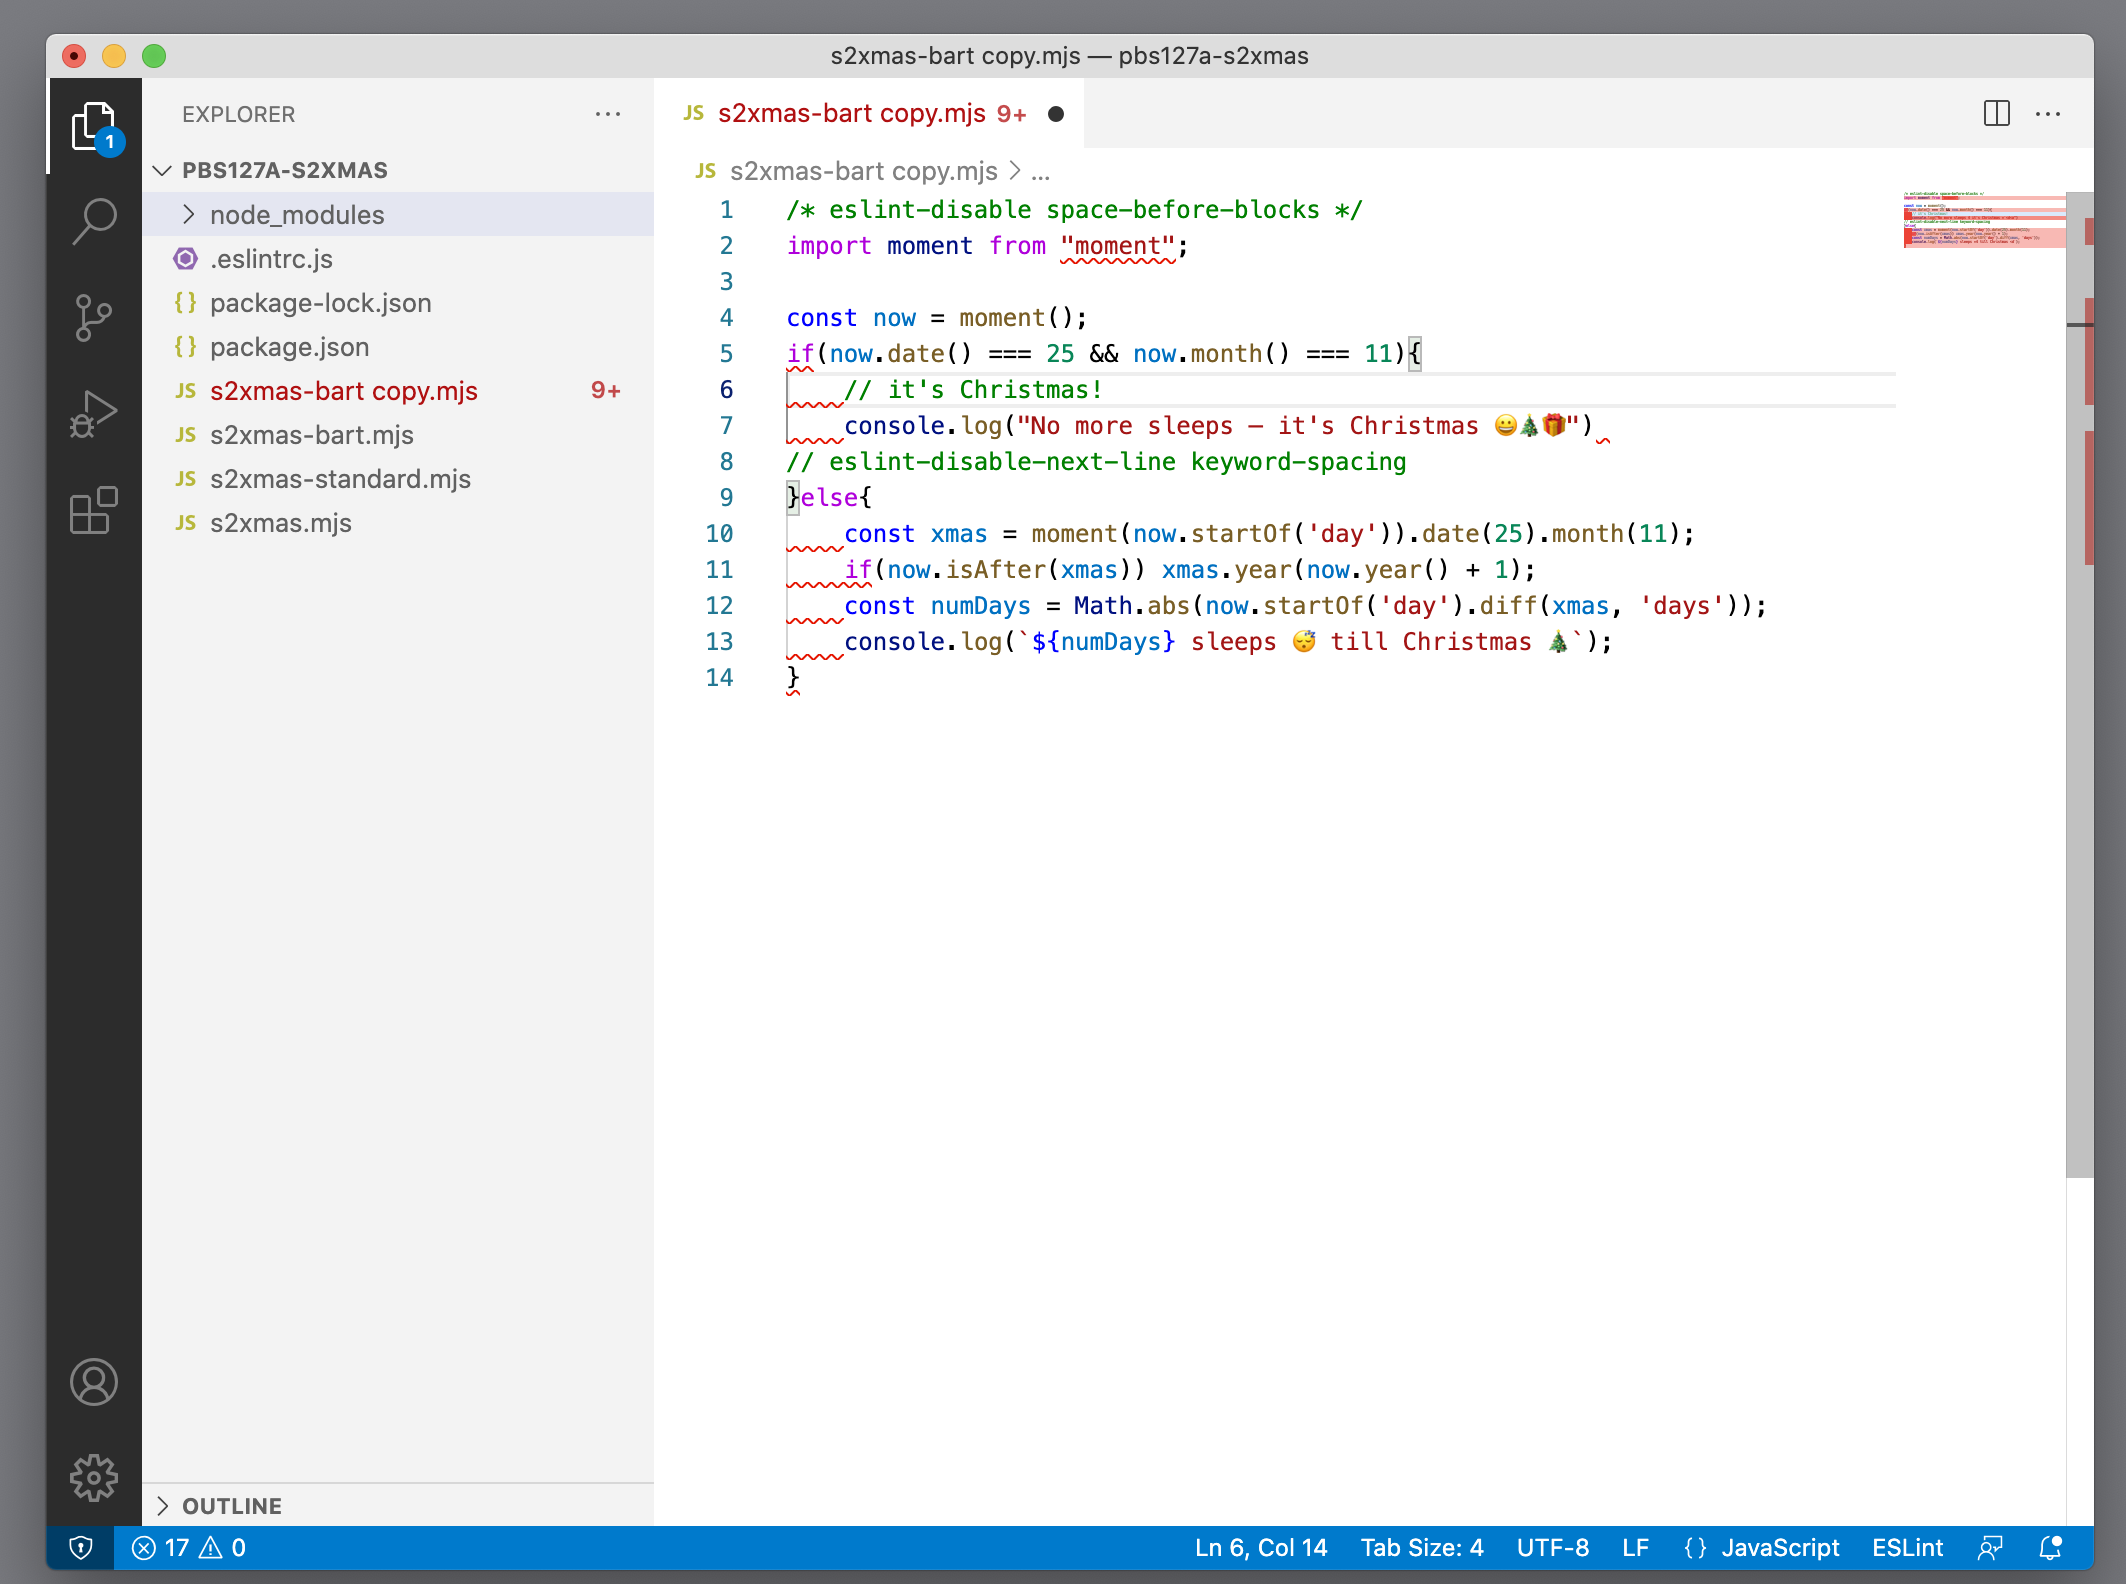
When you select ‘Disable for this line’ or ‘Disable for the entire file’ ESLint will add a configuration comment to the file. In the next screenshot you can see a configuration comment on line 1 that disables the rule ‘space-before-blocks’ for the entire file and on line 8 the rule ‘keyword-spacing’ is disabled only for the next line, aka line 9. As you can see the wavy line on line 9 is gone.
Because of the last settings in my settings.json all problems will be fixed automatically when I save the file.
Rules in eslintrc VS in Configuration Comments
In the example we selected ‘Disable for this line’ or ‘Disable for the entire file’ to solve the errors ESLint found. You can see the comments in lines 1 and 8.
These comments need a bit more elaboration. The difference with the rules in the .eslintrc.js file is the scope. The rules defined in the .eslintrc.js file will be applied to all JavaScript files in your project. The configuration comments only apply to the file they are added to.
So in this example, the rule ‘space-before-blocks’ is disabled for the entire s2xmas-bart copy.mjs file, but not for the other JavaScript in this project.
The same goes for the ‘keyword-spacing’ rule. It’s only disabled for the line that comes after this configuration comment.
The configuration comments can be used to enable as well as ESlint entirely or just for one or more rules for the file they are added to.
The correct syntax for these configuration comments is explained in the ESLint documentation on configuring rules.
Configuration comments are used in case you have a good reason to overrule the code style. E.g., you don’t want to add JSDoc comments to getter functions, but for all other functions, you want ESLint to force you to add a JSDoc block.
As an example, you could add a config comment to disable the ESLint rule ‘require-jsdoc’ before the section with the getter functions and enable them afterwards:
// javascript code here


// eslint-disable require-jsdoc
function getVariable() {
  return myVariable;
}

function getOtherVariable {
  return myOtherVariable;
}

// eslint-enable require-jsdoc


// more code here
Adding Plugins to ESLint
In the previous section we discussed the use of the ‘require-jsdoc’ rule. This rule used to be part of ESLint, but was deprecated in 2018 in favour of a plugin with the same functionality, called eslint-plugin-jsdoc. Having correct JSDoc comments for all functions is a good habit so it’s great to have ESLint help you maintain the JSDoc.
If we follow the installation instructions in the GitHub repository we need to add the plugin to our project and to the .eslintrc.js config file.
In the Terminal we can add the plugin with
npm install eslint-plugin-jsdoc --save-dev
And we can add it to our eslint config file, first we need to add a plugin section:
plugins: [
  'jsdoc'
]
and finally the rules. In the GitHub README file you can find all rules that are available, but we will simply use the recommended set.
So the final .eslintrc.js file will look like this:
module.exports = {
  env: {
    es2021: true,
    node: true,
  },
  plugins: [
    'jsdoc',
  ],
  extends: [
    'standard',
    'plugin:jsdoc/recommended',
  ],
  parserOptions: {
    ecmaVersion: 12,
    sourceType: 'module',
  },
  rules: {
    "semi": ["error", "always"]
  },
};
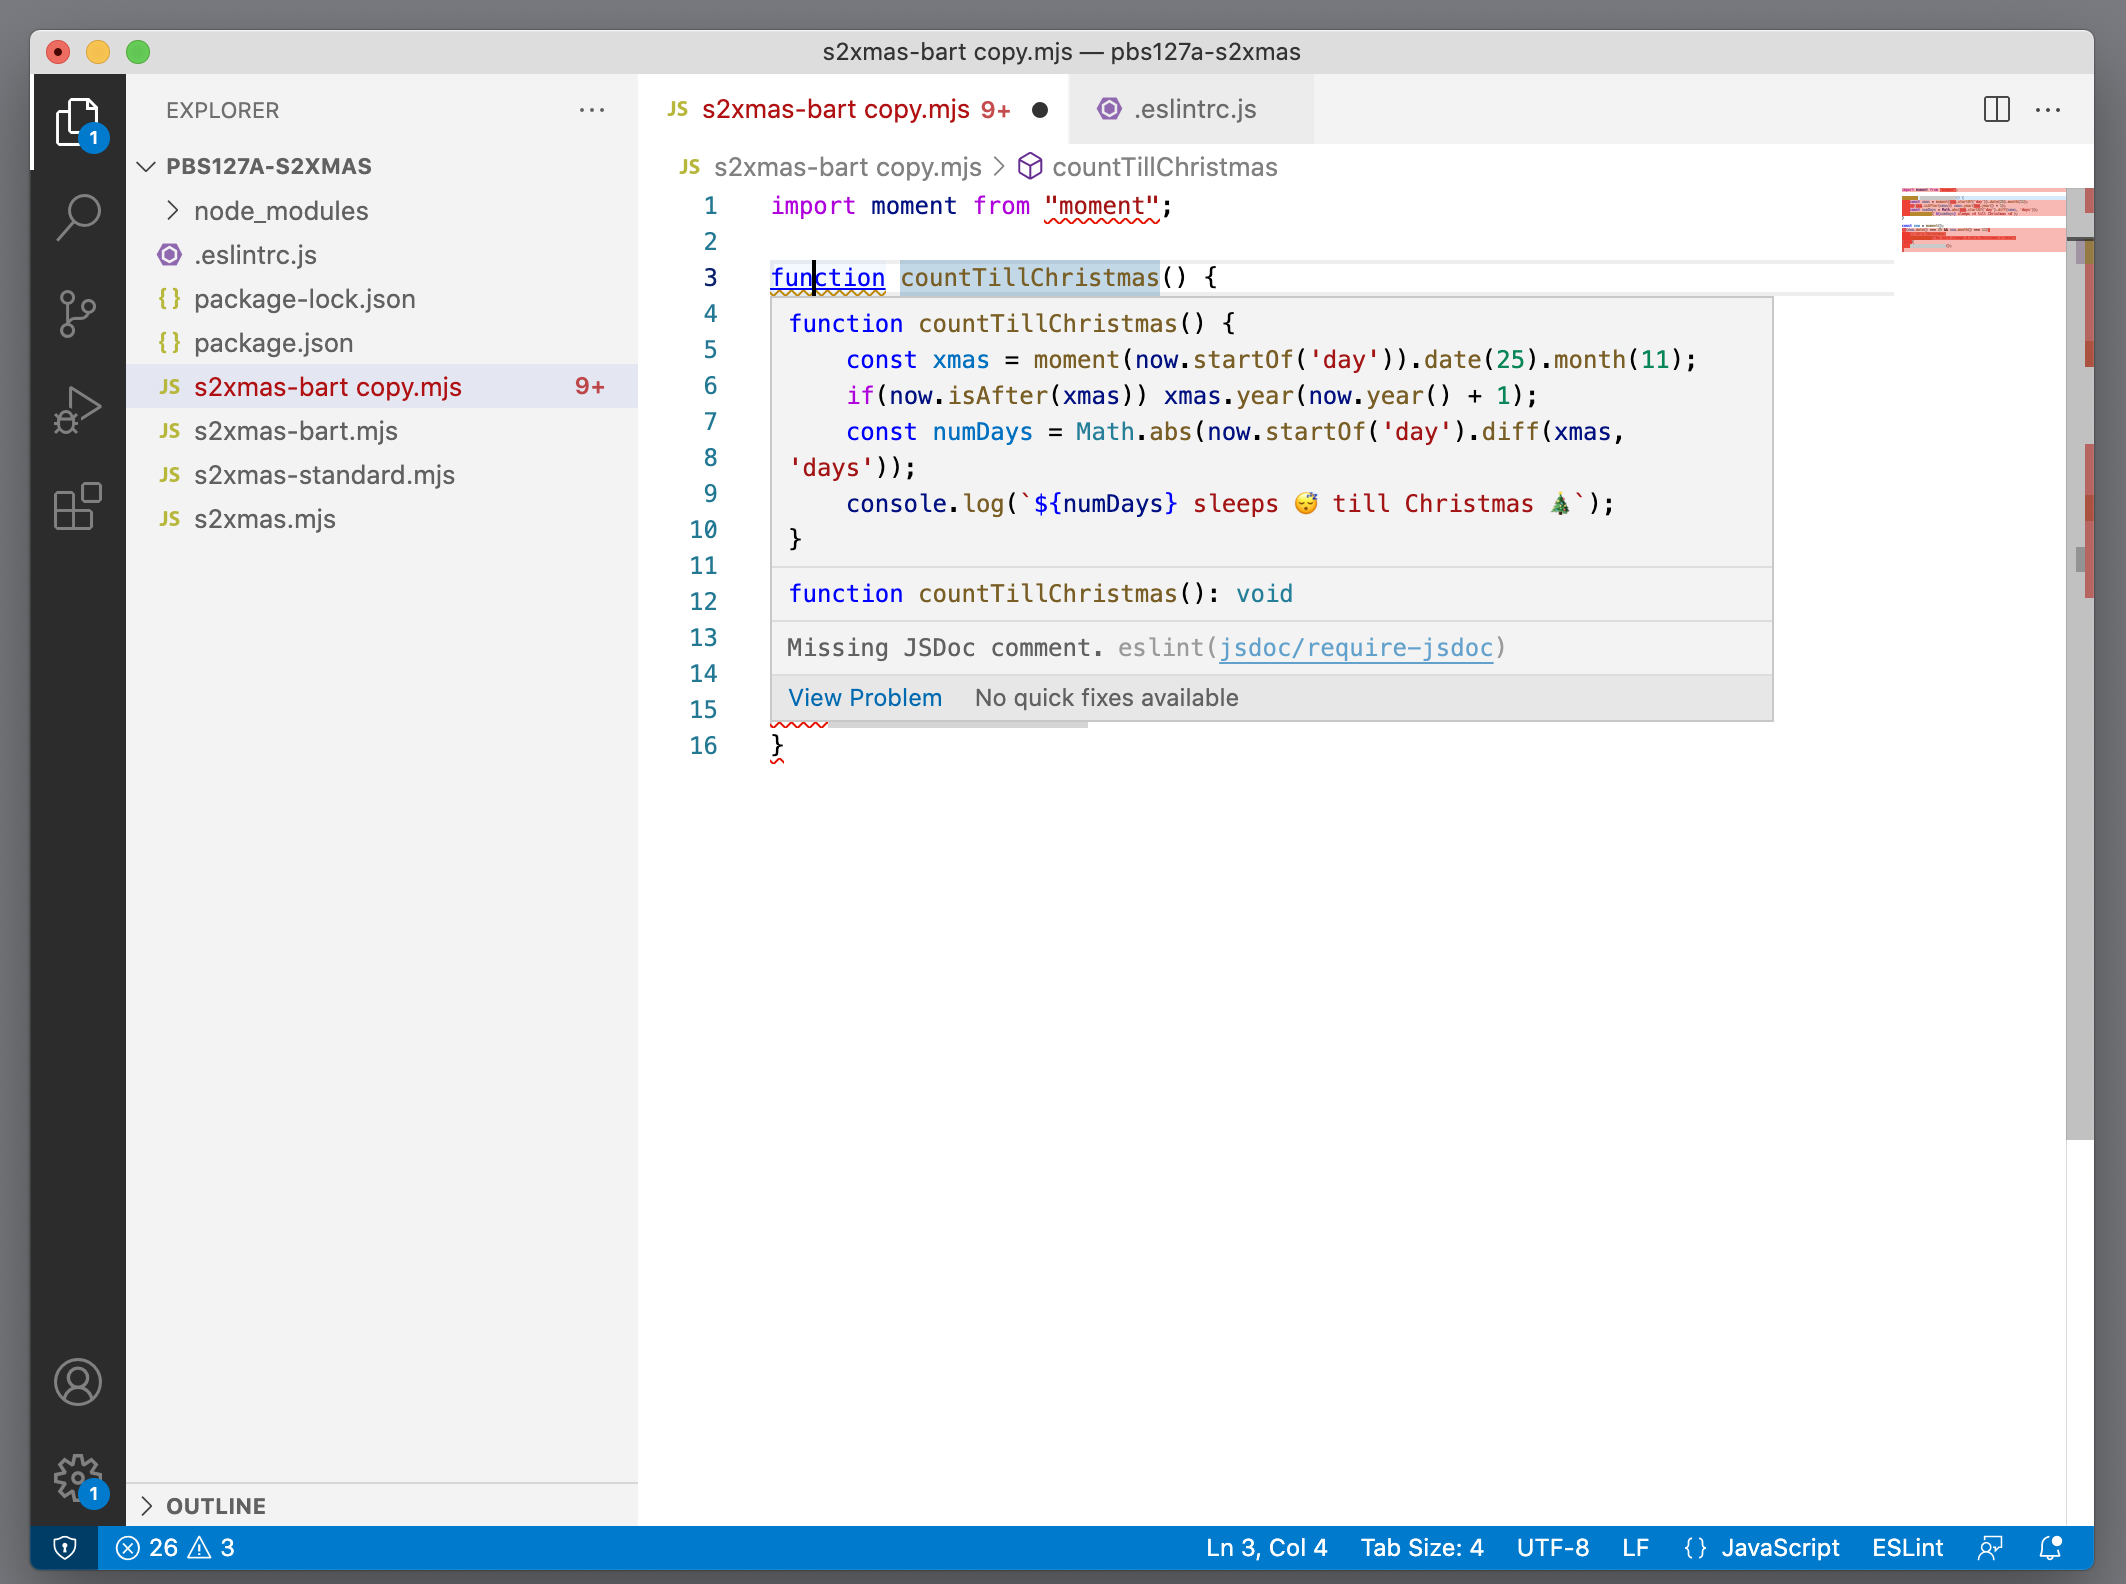
In the next screenshot below, you can see that I have moved the lines in the else part to a function. Thie allows us to click in the function declaration and see that now ESLint complains about a missing JSDoc comment.
Setting up a Different ESLint Code Style in VSCode
When we first set up ESLint, we chose the Standard code style, but there are several very popular code styles. Let’s take a look at a different code style called the Airbnb JavaScript Style. They have a very detailed configuration, and also a great Style Guide. Each setting is not only defined, but the reason behind it is also explained. It is used by several big companies and results in consistent, readable code.
We are going to change the ESLint code style configuration from standard to airbnb.
There are various ‘flavours’ of the Airbnb code style. We are going to use the airbnb-base version, because we’re not interested in the React packages.
The install information explains we need to run the following command in our Terminal.
npx install-peerdeps --dev eslint-config-airbnb-base
Finally, we need to change the configuration in .eslintrc.js to set extends to ‘airbnb-base’ instead of ‘standard’.
module.exports = {
  env: {
    es2021: true,
    node: true
  },
  plugins: [
    'jsdoc'
  ],
  extends: [
    'airbnb-base',
    'plugin:jsdoc/recommended'
  ],
  parserOptions: {
    ecmaVersion: 12,
    sourceType: 'module'
  },
  rules: {
  }
};
I have removed the extra configuration in the rules section for ‘semi’, because it’s part of the default setting in airbnb-base.
If you now open a fresh copy of s2xmas.mjs you will see that ESLint reports different problems and even the version that was fine with the standard code style now has wavy lines.
Once you set up your ESLint configuration, make sure you add your .eslintrc file (with whatever extension it has) to your git repository.
Ignore files
Just like git has its .gitignore file, ESLint supports an .eslintignore file. There is more information in the documentation.
Warning - Test Your Code
Before ending this tutorial, it’s best to point out that in rare cases an ESLint rule might actually cause an unwanted change to your code. That’s why it’s best to try and test your code before you accept and commit the changes ESLint makes. If you’re certain there are no unwanted changes, you can commit your code with the changes. If however there are unwanted changes, try adding a configuration comment above the line that causes the problem to tell ESLint “hands off”.
Final Tips
Start Linting Early
ESLint works best if you add it very early on in your project when you have only a few files. If you add it when you already have hundreds of files, it becomes very tedious to check all of them. However, there is nothing stopping you from adding ESLint at any point. In fact, your code will greatly improve as it becomes more consistent. And if you use a code style like Airbnb, you will probably find lots of little bugs (‘lint’) in your code that can cause very obscure side effects that are hard to find.
Separate ESLint Code Commits
Another tip, especially when you introduce ESLint in a larger project, is to separate the ESLint code changes from the actual code fixes in your git commits. It is very hard to see which code has actually changed when ESLint has added changes to almost every line.
A best practice is to have ESLint fix the linting problems, commit the changes with a commit message that indicates that all code changes were merely ESLint fixes, and then continue with the actual code change and commit that in a separate commit. If future self reads the commit log it’s easy to skip the ESLint changes and check the code commits.
ESLint Doesn’t Know About Libraries
It’s important to understand that ESLint runs before your JavaScript knows what’s happening over in your HTML. If you have scripts to call libraries such as jQuery and Mustache, ESLint doesn’t know that they exist and will give you immediate errors. You can teach ESLint about these libraries by adding a configuration comment at the top of the file. For the two examples I’ve listed, the configuration comments would look like this:
/* eslint-env jquery */
/* global Mustache */
A simple search for ESLint, the name of the library you need to use, and configuration comment will give you the syntax for your library.